Making challah bread is a labor of love, but the end result is well worth the effort - especially when it doesn't last long! This easy recipe will make a challah bread that your family will want on repeat.
Looking for other delicious sweet breads? Try our cinnamon babka and honey cookies.

Quick Look at the Recipe
- ⏲️ Prep Time: 45 minutes
- ⏲️ Cook Time: 30 minutes
- ⏲️ Total Time: 4 hours 15 minutes (including 3 hours rising time)
- 🍽️ Yield: 12 slices (out of 1 large loaf)
- 🥕 Dietary Info: Vegetarian, Dairy Free
- ⚡ Calories: 152 calories per serving (based on nutrition facts in recipe card)
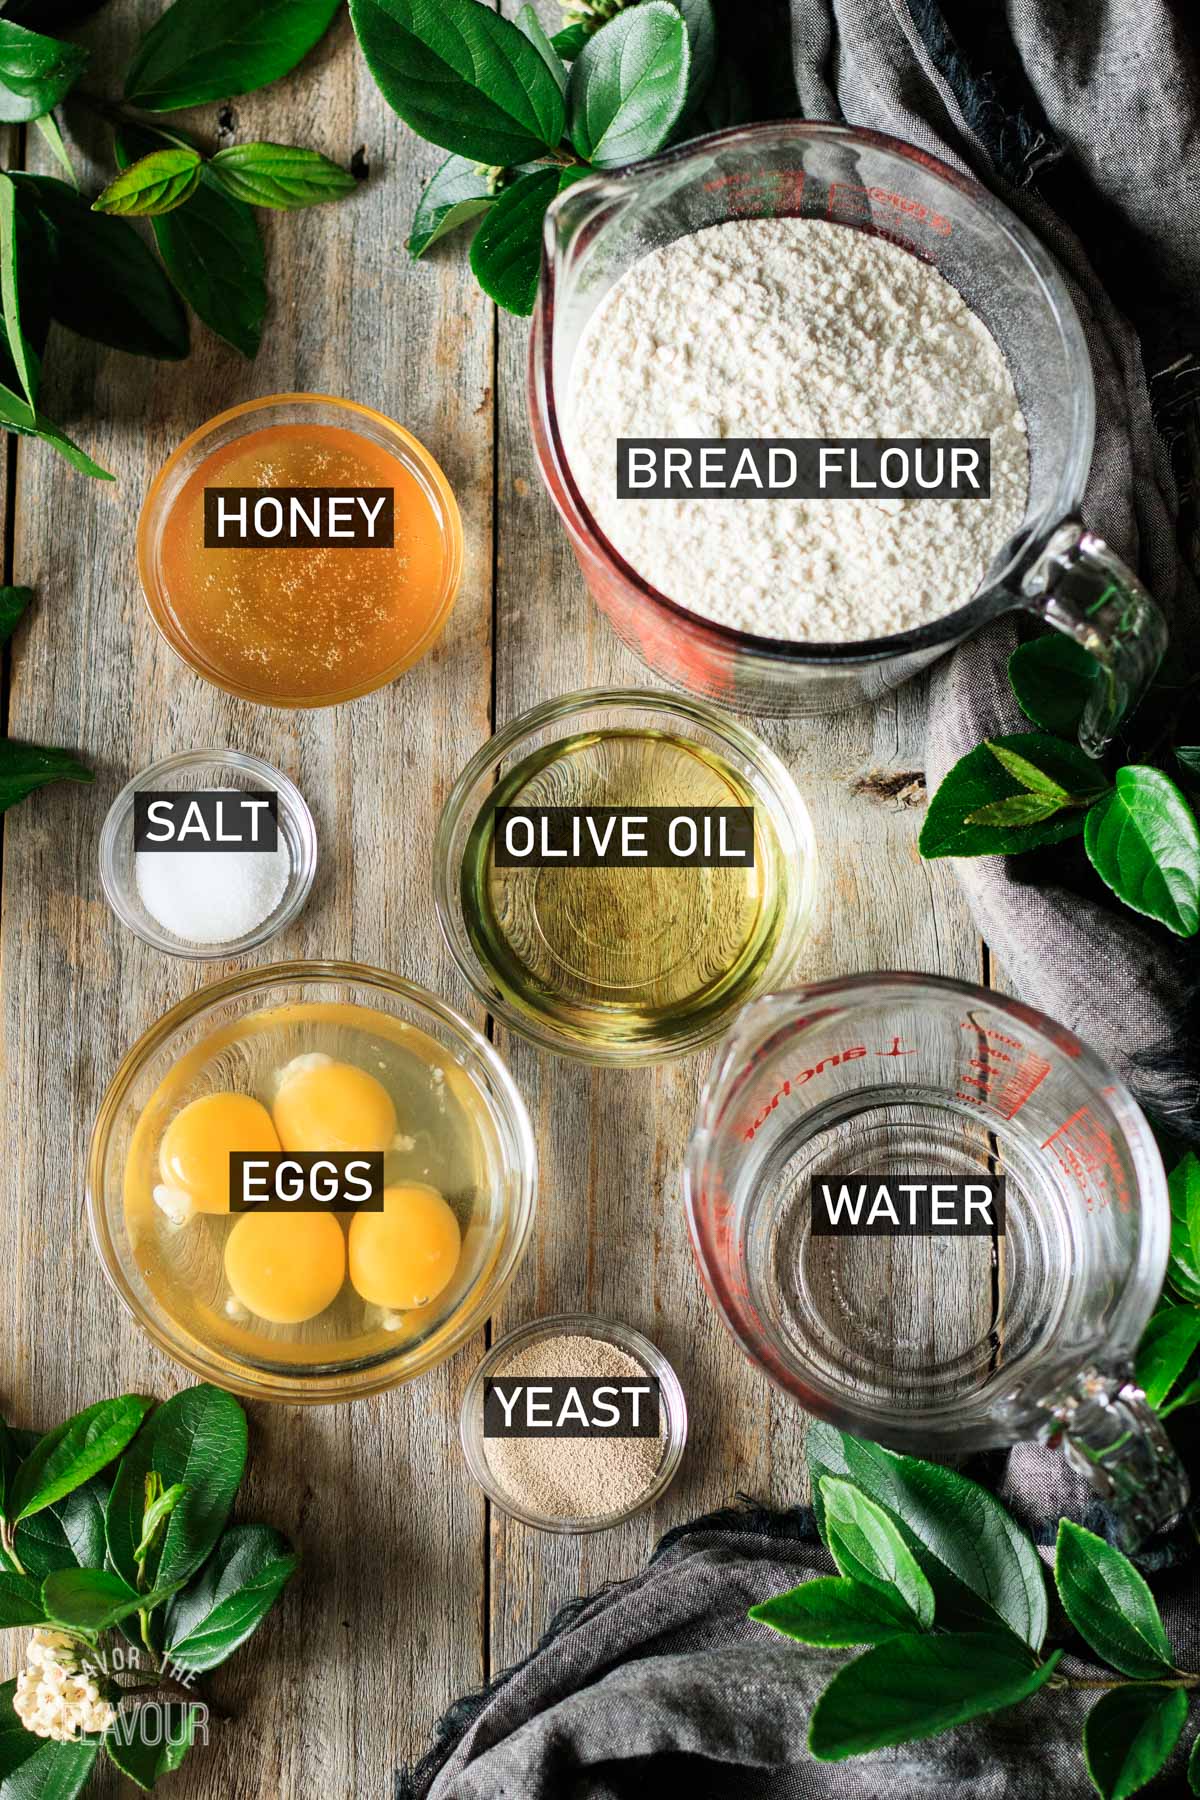
- 🍎 Ingredients: bread flour, dried instant yeast, salt, honey, olive oil, eggs, and water.
- 🥣 Method: Mix up and knead the dough, then let it rise. Punch down and braid, then rise again. Brush with egg yolk and bake.
- ⌛ Time-Saving Hack: Start the dough the night before, and it do its second rise in the fridge overnight. Let it warm up for an hour, then bake the following day.
- 🔪 Equipment: kitchen scale, stand mixer with dough hook, bench scraper, pastry brush, and digital thermometer.
- ⭐ Expert Tip: Knead until a lump of dough can be stretched thin enough to be translucent (windowpane test).
- 🌶️ Flavor & Texture: This challah is fluffy, soft, and utterly delicious! It's perfect on its own, served with butter, or toasted.
Summarize or save this content on
Why This Recipe Works
- It's made with bread flour. All-purpose flour lacks the protein content necessary to make a high-rising, fluffy challah.
- It's made with traditional ingredients. Challah doesn't contain dairy, which according to Jewish dietary laws, this means it can be served with a meal containing meat if desired. The use of honey and olive oil as the sweetener and fat in the dough is also traditional.
- The dough is kneaded properly. Making sure that it passes the windowpane test ensures the dough has proper gluten development for a good rise and crumb structure. (See the recipe card to learn this technique.)
- It won't burn while baking. Stacking the tray with the challah on another tray insulates the base, and covering it with foil near the end of the bake keeps the crust from getting too dark.
Featured Comment
⭐⭐⭐⭐⭐ "I've made so many different challah bread and this one seems to be the best one. Just the right amount of ingredients and portion. I love it! Thank you for sharing this recipe. I will be making it over and over again!"
- Sandy
Jump to:
About
Challah is an enriched Jewish bread that's traditionally braided and served on the Sabbath. Many things about the loaf are symbolic; for example, the braids represent love and unity. Its exact origins are unclear, but most people agree that the modern version started in Eastern Europe during the fifteenth century.
Want to know how to prounounce challah? It's pronounced like "halla," kind of like the first part of "hallelujah."
Leftover challah can be used in several creative and delicious ways, such as French toast or bread pudding. If you shape the challah dough into dinner rolls instead of a braided loaf, it would taste fabulous in these ham and cheese sliders!
Ingredients
Fortunately, challah uses basic ingredients that you probably already have in your pantry. Let's talk about the key ingredients you'll need.
- Bread Flour: This type of flour has a higher protein content than all-purpose, creating more gluten in the dough. This gives the bread a higher rise and fluffier texture.
- Yeast: Use fast-action (aka instant) yeast so you can skip the 10-minute proofing of the yeast in warm water and sugar, but you can use active dry if you like.
- Honey: This dough isn't sweetened with white sugar, but with honey. It's the traditional choice, and also adds extra moisture.
- Olive Oil: Traditional challah doesn't contain dairy, so we're using olive oil as the fat in the dough. Choose a mild flavored oil that won't overwhelm the taste.
See recipe card for full information on ingredients and quantities.
Variations
- Different Braiding Styles: Watch how to braid a 3-9 strand loaf, or how to braid a round loaf for Rosh Hashanah.
- Seeds: Add poppy seeds, sesame seeds, or everything bagel seasoning on the outside of the bread for a crunchy finish.
- Sweet: Add dried fruit, like raisins, mixed peel, or candied grapefruit peel.
- Saffron: Infuse 1 teaspoon of saffron threads in 2 tablespoons of boiling water for at least 30 minutes, then add the liquid to the dough to color it bright yellow.
- Savory: Cut the honey in half and add a savory filling to the dough, such as jalapeños, cheese, garlic, or spicy sausage. Experiment with savory herbs like rosemary, thyme, or oregano as well.
How to Make Easy Challah Bread
Gather the ingredients for the challah.

- Pour the flour into a mixing bowl and add the salt and yeast on opposite sides of the bowl. Stir each one in with your finger. (image 1)
- Add the eggs, honey, and olive oil. Mix with the paddle attachment on low speed until blended, then gradually trickle in the water while the mixer is running until a sticky dough has formed. (image 2)
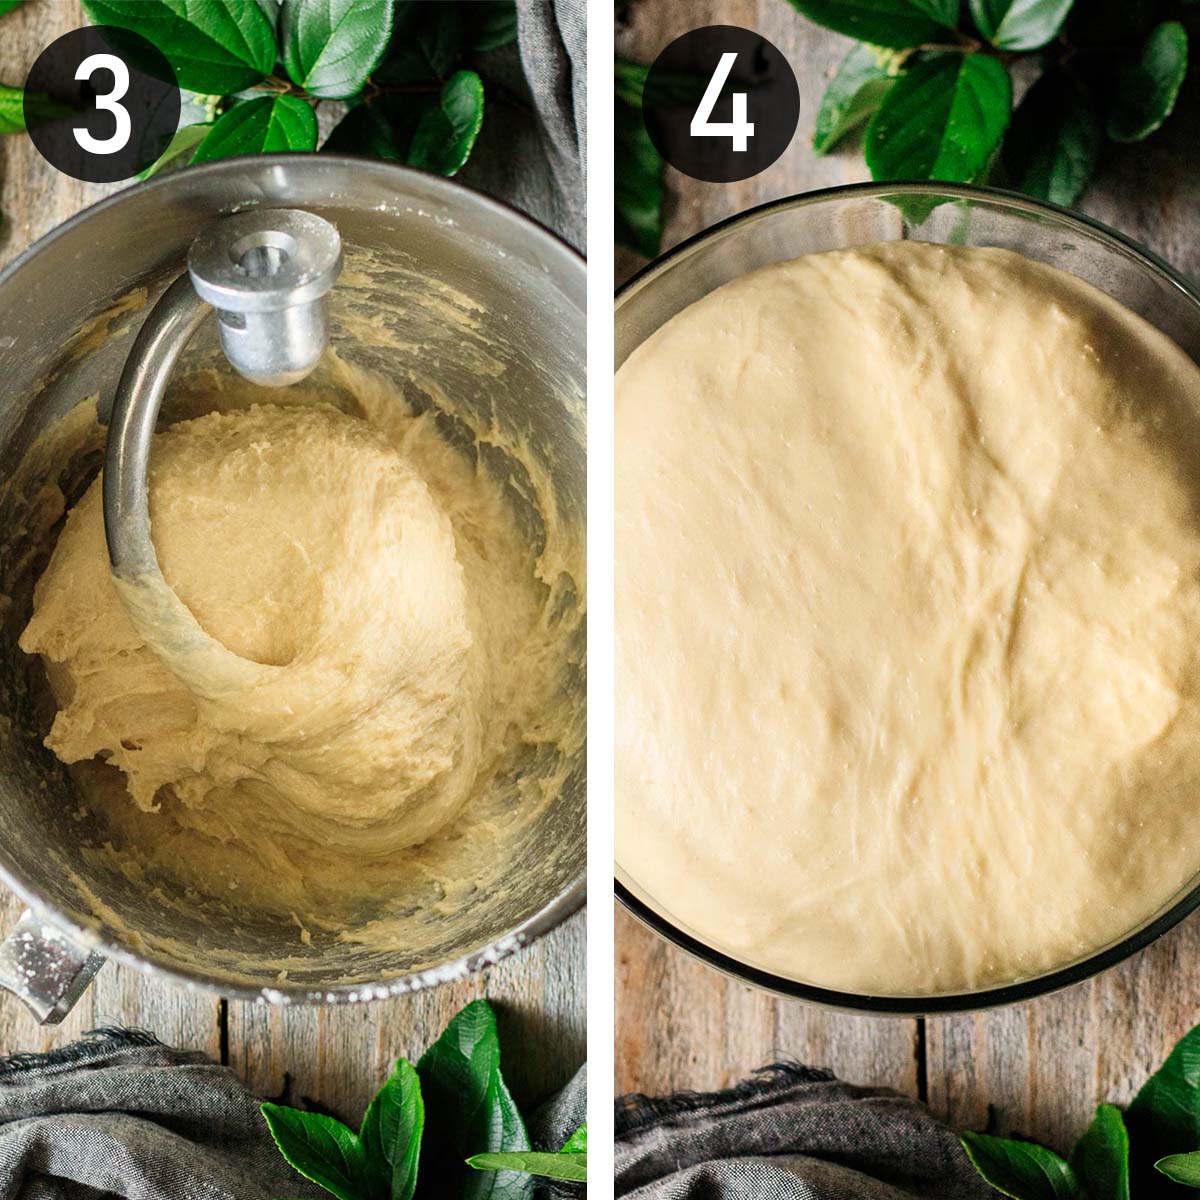
- Knead by hand or with the hook (affiliate) on medium low speed. The dough is kneaded sufficiently when it's beautifully smooth and silky. You'll probably have to add a little flour as you knead to get it smooth. It also should pass the windowpane test. (See the recipe card for a description of this process.) (image 3)
- Place the dough in a lightly oiled bowl, cover tightly with plastic wrap, and set aside in a warm place until doubled in size, about 1 ½ to 2 hours. If you lightly smack the top, it should fall back. (image 4)

- Punch down the dough to remove large air pockets, then divide into five equal pieces with a bench scraper (affiliate). Weigh each piece on a kitchen scale (affiliate) to make sure they're around the same size.
Roll each piece into a rope roughly 20 inches long. If the ropes are not rolling out easily, let them sit for a minute or two to relax the gluten, then try again. Aim to get all 5 pieces the same length and thickness. - Braid the challah as desired. (See the "Braiding" section of the post for a visual demonstration of a four-strand braid.) You can choose a 4-strand braid like I used for Finnish pulla bread and everything bagel bread, or you can try a creative stacked braiding technique as used in Czech vánočka.
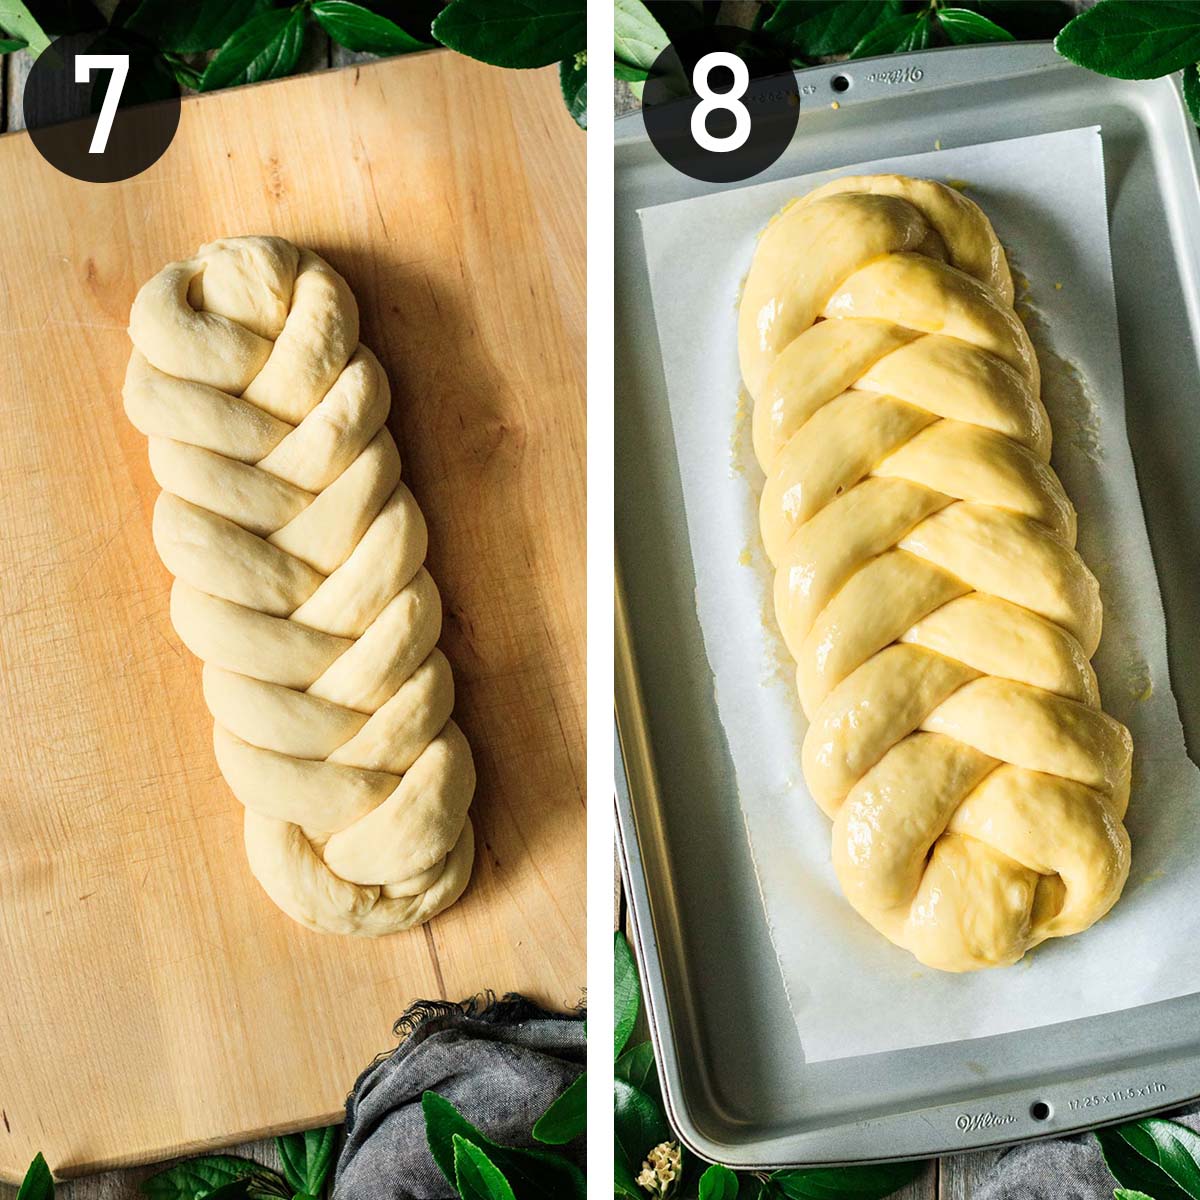
- Tuck the ends of the braid under the loaf. (image 7)
- Place the braid on a parchment-lined cookie sheet, cover with plastic wrap, and set aside in a warm place until nearly doubled in size and springy to the touch, about 1 hour. Brush the loaf with a mixture of egg yolk and water. (image 8)
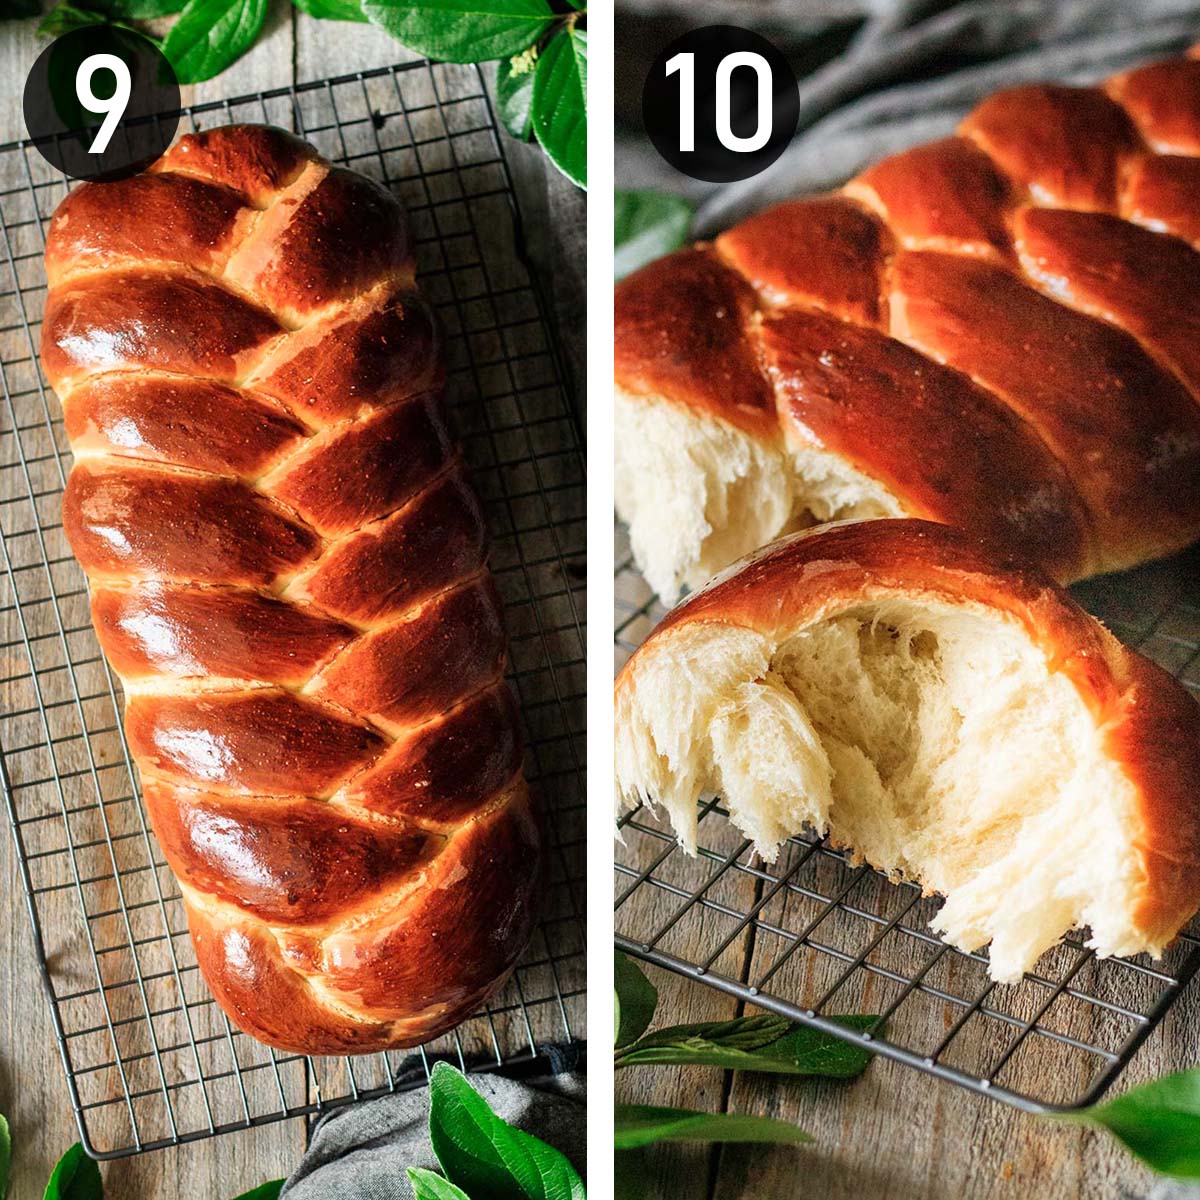
- Stack the baking tray on top of another cookie sheet to insulate the base and prevent it from burning. Bake at 375°F for 25-30 minutes, until the loaf has an internal temperature of 190°F with a meat thermometer (affiliate). Cover with foil after 10 minutes if it's getting too dark. (image 9)
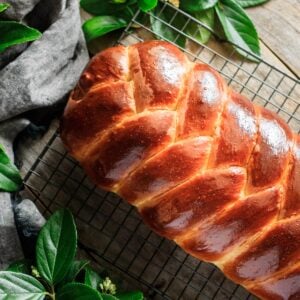
- Let the challah bread cool completely on a wire rack before serving. Tear the challah, and enjoy! (image 10)
Braiding
Braiding challah can be as simple or as complicated as you like! Here is a simple 5-strand braid, demonstrated in the photos below.
- Divide the dough into 5 pieces, then roll each one into a 20-inch rope. Make sure all the ropes are the same length.
- Lay the ropes beside each other. Divide them into one group of 2 strands and another group of 3 strands, keeping the strands touching at the top.
- Cross the 5th strand over and lay it beside the 2nd . Next, cross the 1st strand over and lay it beside the 4th strand. Repeat until the whole loaf is braided.
- Tuck the excess under the ends.

If you want to try another style of braid, here's how to braid a 3-9 strand loaf, and here's how to braid a round loaf for Rosh Hashanah.
Recipe FAQs
The round loaf made for Rosh Hashanah is shaped to look like a turban and represents the cycle of the new year. Watch this video to learn how to braid a round challah.
Most brioche recipes contain butter and milk, while challah contains no dairy products so it can be kosher. (Jewish dietary laws forbid eating meat and dairy products in the same meal.) Egg bread is an alternate name for this enriched dough.
Challah is made with olive oil instead of butter, and contains eggs, which increase the protein. You can make it healthier by substituting part of the bread flour for whole wheat flour; just realize that it will make the bread denser and more earthy tasting. Scroll down to the bottom of the recipe to read the nutrition facts.
The braids represent love and unity. The number of strands in each braid also has symbolism: for example, a three-strand braid represents three commandments God gave regarding the Sabbath. A twelve-strand braid represents the twelve tribes of Israel.
Make Ahead: You can make the dough the night before and let it rise in the fridge overnight. Shape and bake the next day. Fully baked challah can keep at room temperature for a few days, but it tastes the freshest within 24 hours after baking.
Freezing: Store slices or chunks in an airtight container or zip-top freezer bag for up to 1 month; whole loaves should keep for 2 months. (If you're freezing an entire loaf, use an extra-large freezer bag.)
Defrost it by letting it sit at room temperature for 5 hours or so. Don't refrigerate the bread, as it will go stale very quickly in the fridge. It's not recommended to freeze unbaked dough. It won't rise as high as freshly made.
Reheating: Wrap the bread tightly in aluminum foil to prevent it from drying out or burning, then bake at 350°F for 10 minutes or until warm. To warm up individual slices or chunks, microwave on high for 10-20 seconds, until desired temperature is reached.
Serving Challah Bread
Traditionally, Jews serve challah on Friday evening (Shabbat). They cover two loaves with a special cloth, representing the dew that covered the manna God provided for the children of Israel during their desert wanderings. A blessing is recited over a cup of wine, then each person washes their hands. The cloth is removed, a nick is made in the bread, and the loaves are held up and blessed.
Then, the bread is either torn or sliced, depending on rabbinic tradition. (Not using a knife reminds us to keep the Sabbath peaceful and also brings to mind when God stopped Abraham from killing his son, Isaac, with a knife.) Salt is traditionally served with the bread to remind the partakers of the Temple offerings.
Looking for other Jewish treats to serve? You'll want to try these honey cookies. Or try one of our holiday breads, like Czech vánočka, Mexican rosca de reyes, Spanish roscón de reyes, Italian panettone, Venezuelan pan de jamón, and American Cinnabon cinnamon rolls.

Expert Tips
- Use bread flour for the best results. It really makes a difference how your bread rises, and it makes it fluffier!
- Weigh the solid ingredients for an accurate measurement. Otherwise, you may get too much flour or other ingredient, throwing off the ratios.
- Don't stretch the ropes of dough as you braid them. This will make the loaf fat at one end and skinny on the other.
- Why is it dense? The loaf probably didn't rise enough before it was baked, resulting in a dense, doughy texture. Next time, let it rise until springy to the touch and almost doubled in size before baking.
- Why is it dry? The loaf was most likely baked too long. Sometimes, it's hard to tell when a loaf is fully cooked, so use a meat thermometer. Poke it into the thickest part of the bread and wait a few seconds. It should read 190°F when the loaf is fully baked.
Other Sweet Breads You'll Love


Recipe
Easy Challah Bread
Ingredients
- 4 cups bread flour
- 3 teaspoons fast-action yeast
- 2 teaspoons fine salt
- 5 tablespoons liquid honey
- ⅓ cup light-tasting olive oil
- 2 large eggs
- 2 large egg yolks
- ⅔ cup water
- 1 large egg yolk, for glazing
Instructions
Making the Dough
- Warm the water to 115 F.
- Place the bread flour in a large mixing bowl and add the salt and yeast on opposite sides of the bowl, stirring in each one with your finger. Pour in the honey, olive oil, eggs, and yolks.
- Gradually add the warm water as you mix on low speed with the paddle attachment of a stand mixer (or by hand), trickling in a little at a time to create soft, slightly sticky dough. You may not need all the water.
- Knead on medium-low speed with the hook for 5-7 minutes, until the dough is smooth, no longer sticky, and has a glossy sheen on its surface. You may need to add a spoonful or two of flour to get the right consistency. (Alternatively, it turn out onto a floured surface and knead for 10 to 15 minutes.) Use the windowpane test to see if it's kneaded enough by pulling off a lump of dough and stretching it between the thumb and forefinger of each hand. If it can stretch until it's translucent without breaking, it's kneaded enough. If not, knead for a minute longer and check again.
- Shape the dough into a ball, place in an oiled bowl, and cover tightly with plastic wrap. Set aside in a warm place until about doubled size, approximately 1 ½ to 2 hours.
Shaping the Challah
- Turn out the dough onto a lightly floured surface and punch it down all over to knock out excess gas. Divide into 5 equal pieces using a bench scraper, weighing the pieces with a scale to make sure they are equal in weight.
- Roll each piece into a rope about 20 inches long. If you're having trouble rolling out the strands, let them rest for a couple minutes while you work on another strand. This will relax the gluten, allowing them to roll out more easily.
- Line up the 5 ropes side by side, then squeeze them together at the top to join. Split the strands into two groups: a group of two on the left, and a group of three on the right.
- Begin the braiding by crossing over the third strand from the second group and placing it beside the second strand in the first group. Then, cross over the first strand from the first group and place it beside the first strand in the second group. Repeat this process until the whole challah is braided, then pinch the ends to seal and tuck the ends underneath. Gently pick up the loaf and place it on a lightly floured 11 by 17-inch cookie sheet.
- Cover with plastic wrap and let it prove in a warm place until doubled in size, about 1 hour.
- About 10 minutes before the bread is done proving, preheat the oven to 375°F.
Baking the Challah
- Beat the egg yolk with a little water to thin it, then brush it on the risen loaf.
- Stack the tray of challah on top of another cookie sheet to help prevent the base from cooking too quickly, then bake at 375°F for 10 minutes. Check the bread without opening the door, and if it's getting too dark, cover it with aluminum foil. Lower the temperature to 325°F and bake for another 15-20 minutes. The bread should be a rich golden brown and have an internal temperature of 190°F.
- Let the loaf cool completely on a wire rack before slicing and serving to allow the crumb structure to set, about 1 hour. Serve with salt or butter.
Video
Notes
- Use good quality ingredients. Especially be sure to use a good bread flour; my favorite is King Arthur.
- Don't stretch the ropes of dough as you braid them. This will make the loaf fat at one end and skinny on the other.
- Dense bread? It probably didn't rise enough, resulting in a doughy texture. Next time, let it rise until springy to the touch and almost doubled in size before baking.
- Too dry? The loaf was most likely baked too long. Insert a meat thermometer into the thickest part of the bread and wait a few seconds. It should read 190 F when the loaf is fully baked.
Nutrition
Serving sizes and nutritional information are only an estimate and may vary from your results.
Kathi
I make this bread once a month for our church’s Communion bread. It’s absolutely beautiful when our Pastor raises it up (and it’s delicious too).
Emma Fajcz
What an honor! I'm so glad that you enjoy this recipe and thanks for sharing this!
Michael Harryman
So good, so lovely! Thanks for sharing!
Emma Fajcz
You're very welcome, Michael! We're so glad that you enjoyed the challah!
Samm
I've made this several times now and love the bread. However I always have to add more water due to the dough being so dry and burning out my mixer
Emma Fajcz
Sorry to hear that the dough has been dry, Samm! I would encourage you to weigh the ingredients with a scale, as having too much flour in the dough will make it dry. Also, depending upon the climate and humidity where you are, you might need more water than I use in my warm and humid climate; always go by look and feel! Glad you are enjoying the challah!
Dorian Shine
Thanks for sharing this recipe. Made a loaf before and decided to see if I could make two smaller loaves. They turned out beautiful! Baking this bread makes me look like such an accomplished baker. ; )
Dorian
Emma Fajcz
We're so happy to hear that you enjoyed the challah and that you're having fun making bread, Dorian! Thanks so much for trying our recipe.
Alicia
Wonderful recipe. Made the most amazing bread.
Emma Fajcz
Thank you! We're pleased that you enjoyed it!