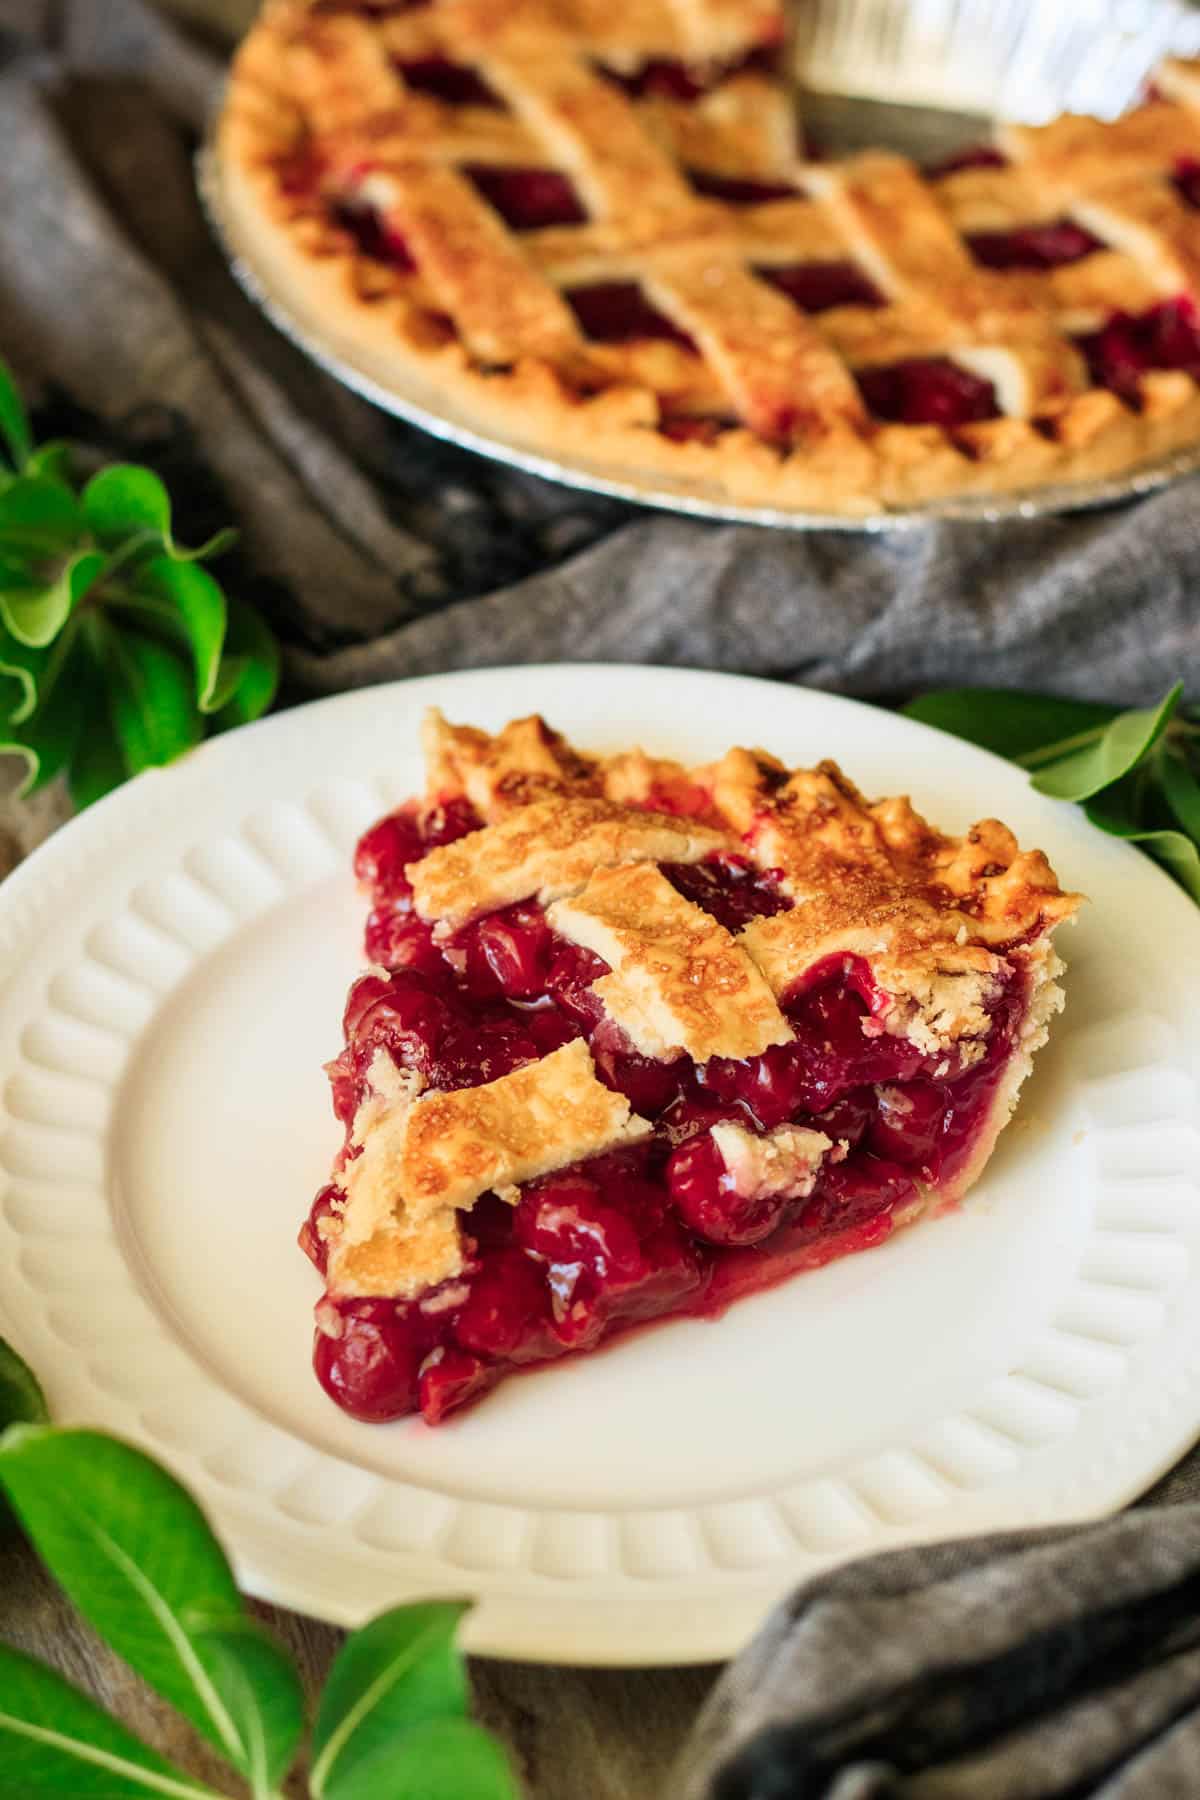
Craving a slice of sour cherry pie this summer? Try our sour cherry pie recipe with canned sour cherries, it's a quick, easy and delicious treat made with flaky pastry.
If you love cherries and berries, then we think you will enjoy this blueberry frangipane tart and our cranberry apple galette.

Quick Look at Sour Cherry Pie Recipe
- ⏲️ Prep Time: 45 minutes
- ⏲️ Cook Time: 40 minutes
- ⏲️ Total Time: 1 hour 25 minutes (not including cooling time)
- 🍽️ Yield: 8 slices from one 9-inch pie
- 🥕 Dietary Info: Vegetarian; can be made Gluten Free & Dairy Free
- ⚡ Calories: 466 calories per serving (based on nutrition facts in recipe card)
- 🍒 10 Ingredients: canned sour cherries, sugar, cornstarch, lemon juice, salt, butter, almond extract, shortcrust pastry, egg, and demerara sugar.
- 🥣 Method: Oven Baked
- ⌛ Time-Saving Hack: Using canned cherries means you won't need to manually pit the cherries first.
- 🔪 Equipment: saucepan, whisk, 9-inch pie plate, pastry brush.
- ⭐ Expert Tip: Let it cool completely before slicing and serving, or the filling will not be set.
- 🥧 Flavor & Texture: This sour cherry pie has the perfect balance between tart and sweet in the filling along with a hint of almond extract and crisp, golden, flaky pastry.
Summarize or save this content on
Why You'll Love This Recipe
- Made with Tart Cherries, Not Sweet: Using tart cherries ensures the very best flavor: a perfect balance between tart and sweet.
- Easy to Make: The filling comes together in just a few minutes. Then, just assemble the pie, bake, and cool.
- Perfect Pastry: Using our easy homemade flaky shortcrust pastry ensures a delicious, golden crust that's just as tasty as the filling. No more dry, crumbly pastry!
Featured Comment
⭐⭐⭐⭐⭐ "Cherry pie is so good! I think that the demerara sugar adds a bit of crunch to the top of the pie. The tart cherries are really good! I like them almost as much as I like fresh cherries. The lattice on yours looks amazing."
- Beth
Jump to:
Ingredients
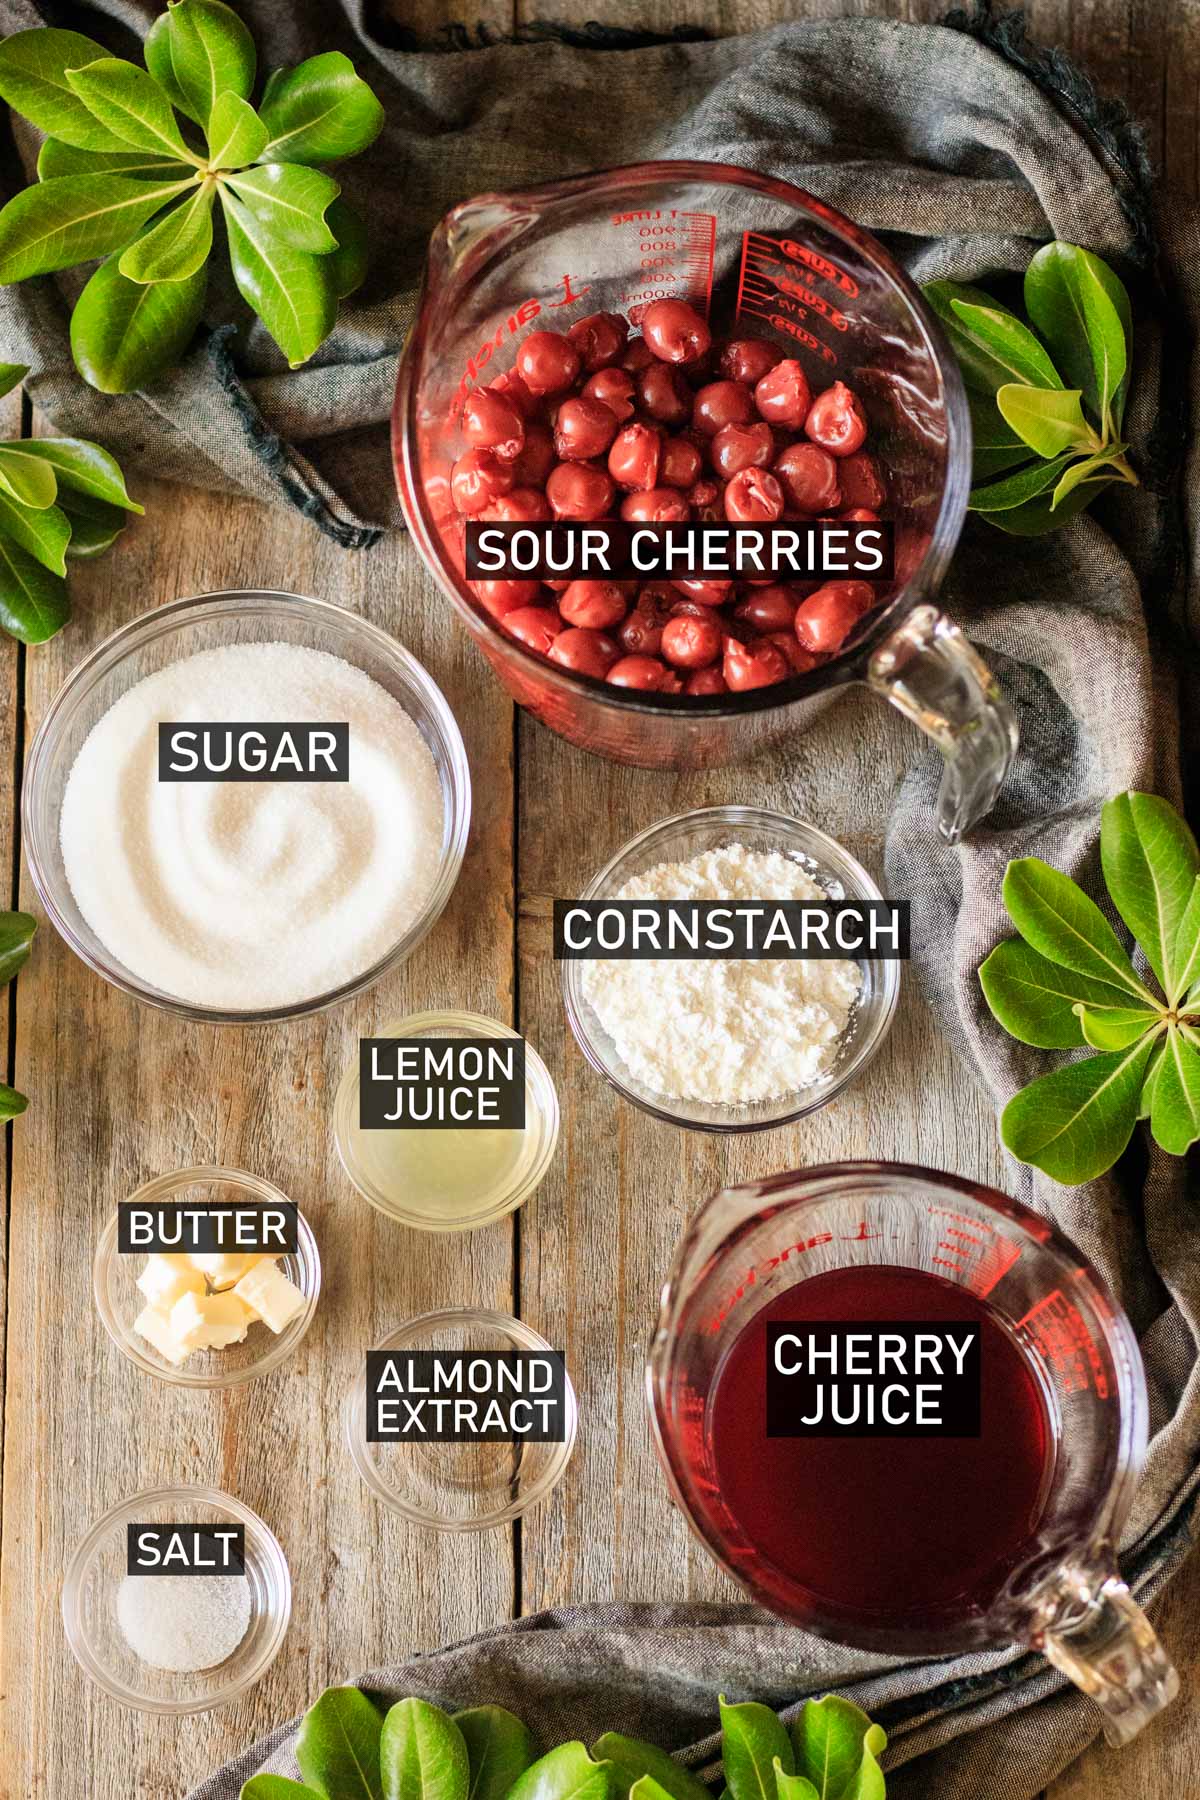
Curious about what ingredients you need to make a sour cherry pie from scratch? Let's dive into the key ingredients for this delicious summer cherry pie.
- Cherries: I recommend using fresh, pitted Morello or Amarella cherries or canned sour cherries. They perfectly complement the almond extract and flaky pastry.
- Almond Extract: This important ingredient really takes the filling to the next level! You'll love how this extract enhances the cherry flavor.
- Lemon Juice: This ingredient adds an extra touch of brightness to the filling.
- Cornstarch: This traditional ingredient thickens the filling. It will take a few minutes on the heat, but keep whisking and the cornstarch will thicken the juices.
See recipe card for full information on ingredients and quantities.
How to Make Sour Cherry Pie
Gather the ingredients for sour cherry pie.
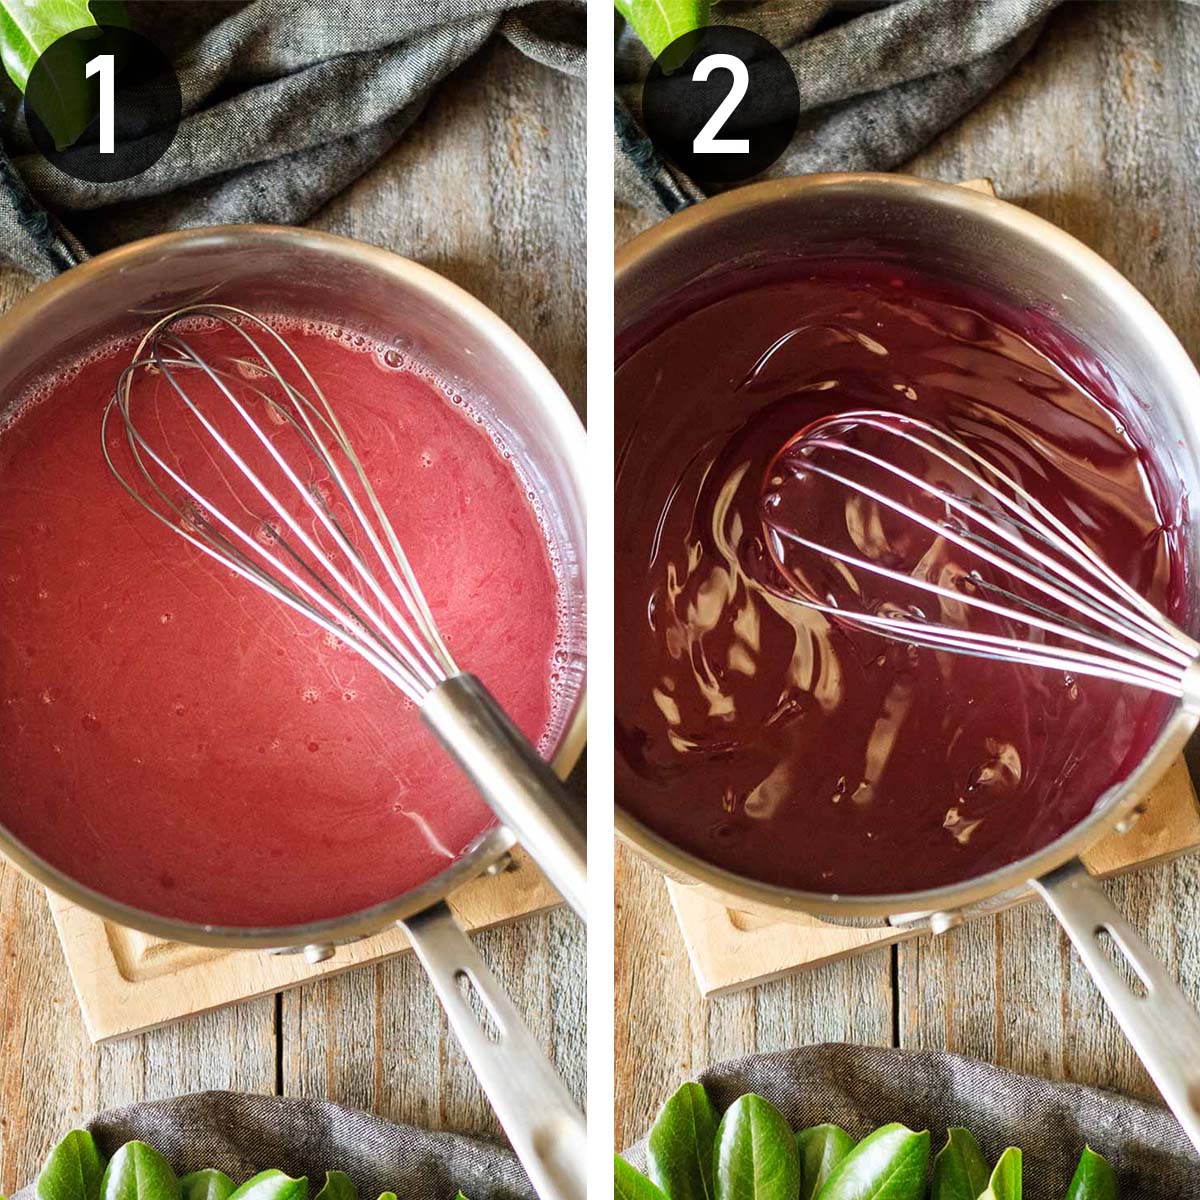
- Whisk together the ½ cup of liquid from the canned cherries, sugar, lemon juice, salt, and cornstarch.
- Place over medium heat and keep whisking until the mixture has thickened and just begins to boil.
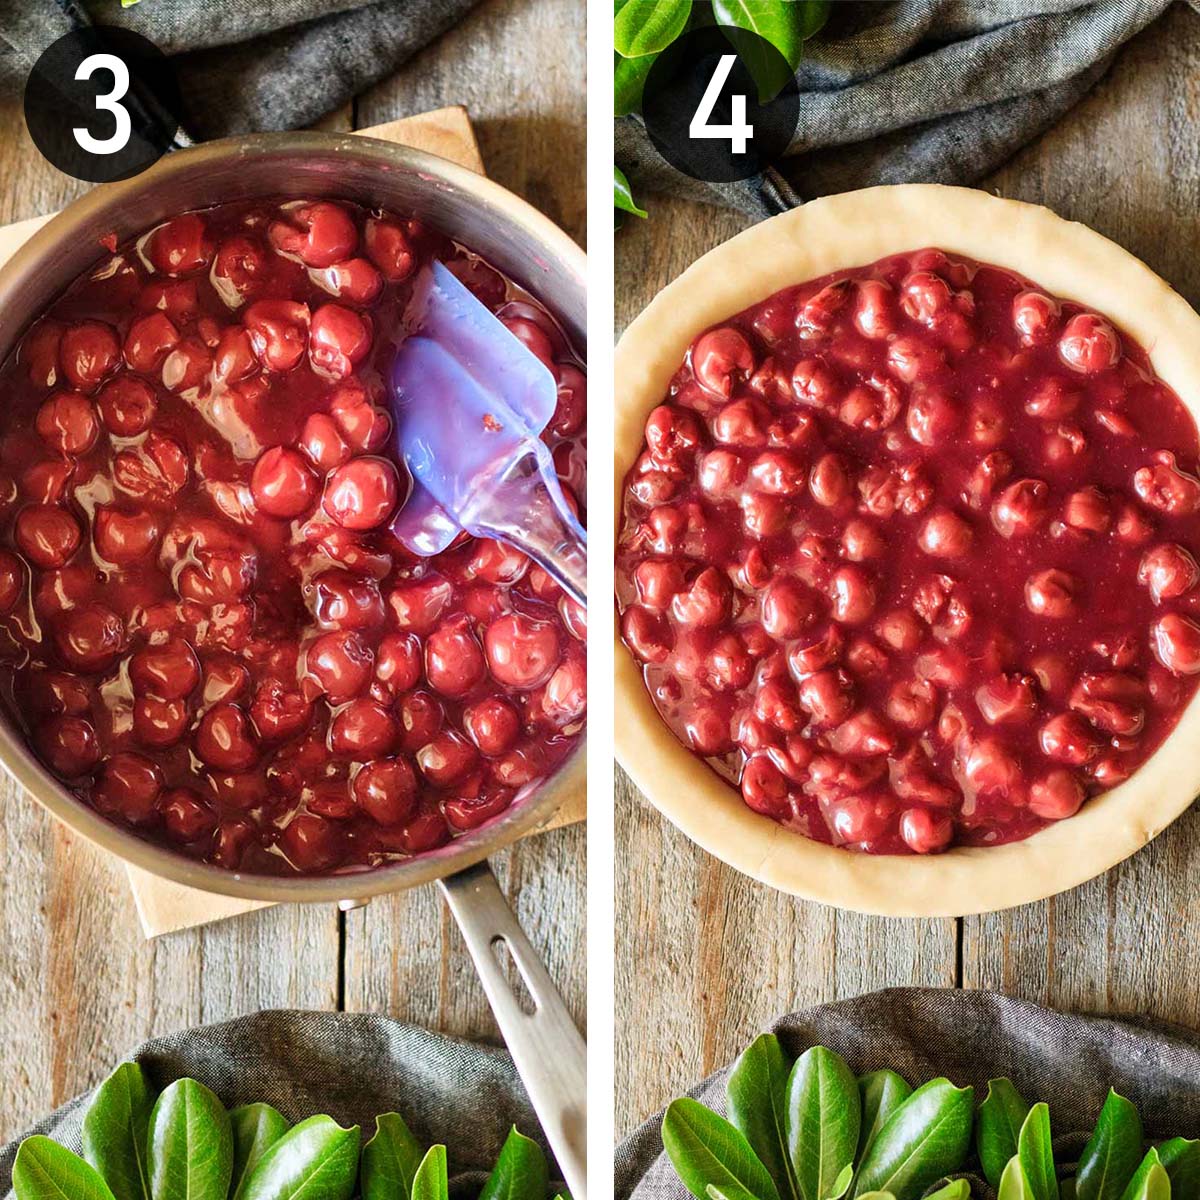
- Whisk in the butter and almond extract, then fold in the canned cherries until evenly mixed. Let the filling cool some.
- Dump the cooled filling into a 9-inch crust. (Warning: if you put the hot filling on top of the pastry, it will melt the butter/lard in the pastry, making it greasy and soggy. Give the filling 10-20 minutes to cool before putting it in the pie.)
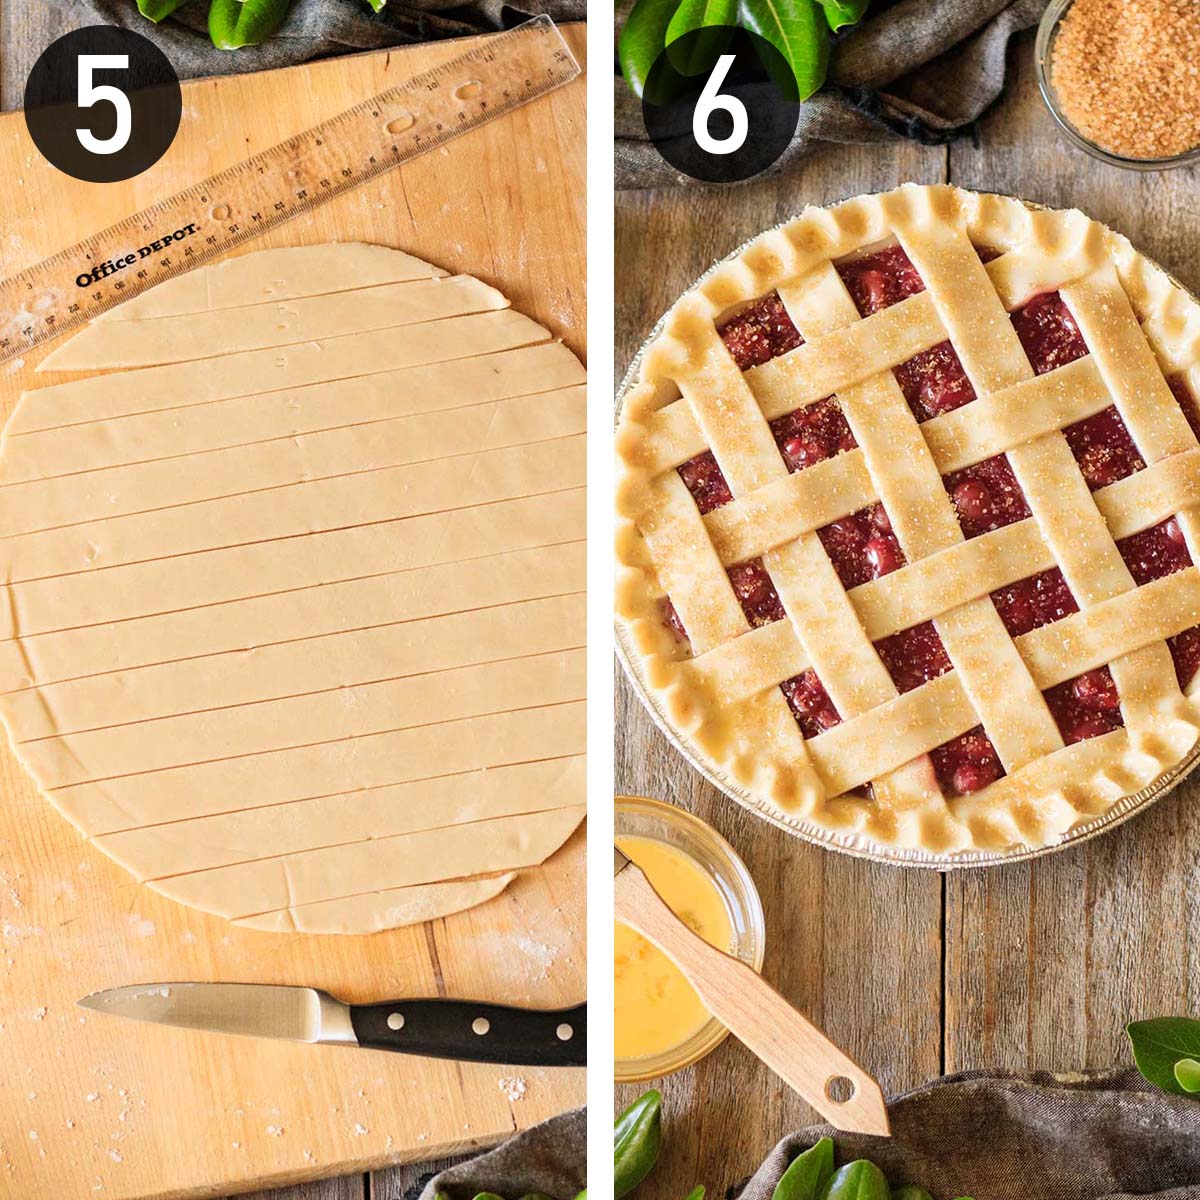
- Cut strips of pastry with a ruler and paring knife.
- Lay a few of the strips horizontally across the top, then weave a few of the other strips over and under them to create a lattice. Crimp the edges by pinching the pastry with your thumb and index finger. Brush the pastry with beaten egg and sprinkle liberally with demerara sugar.
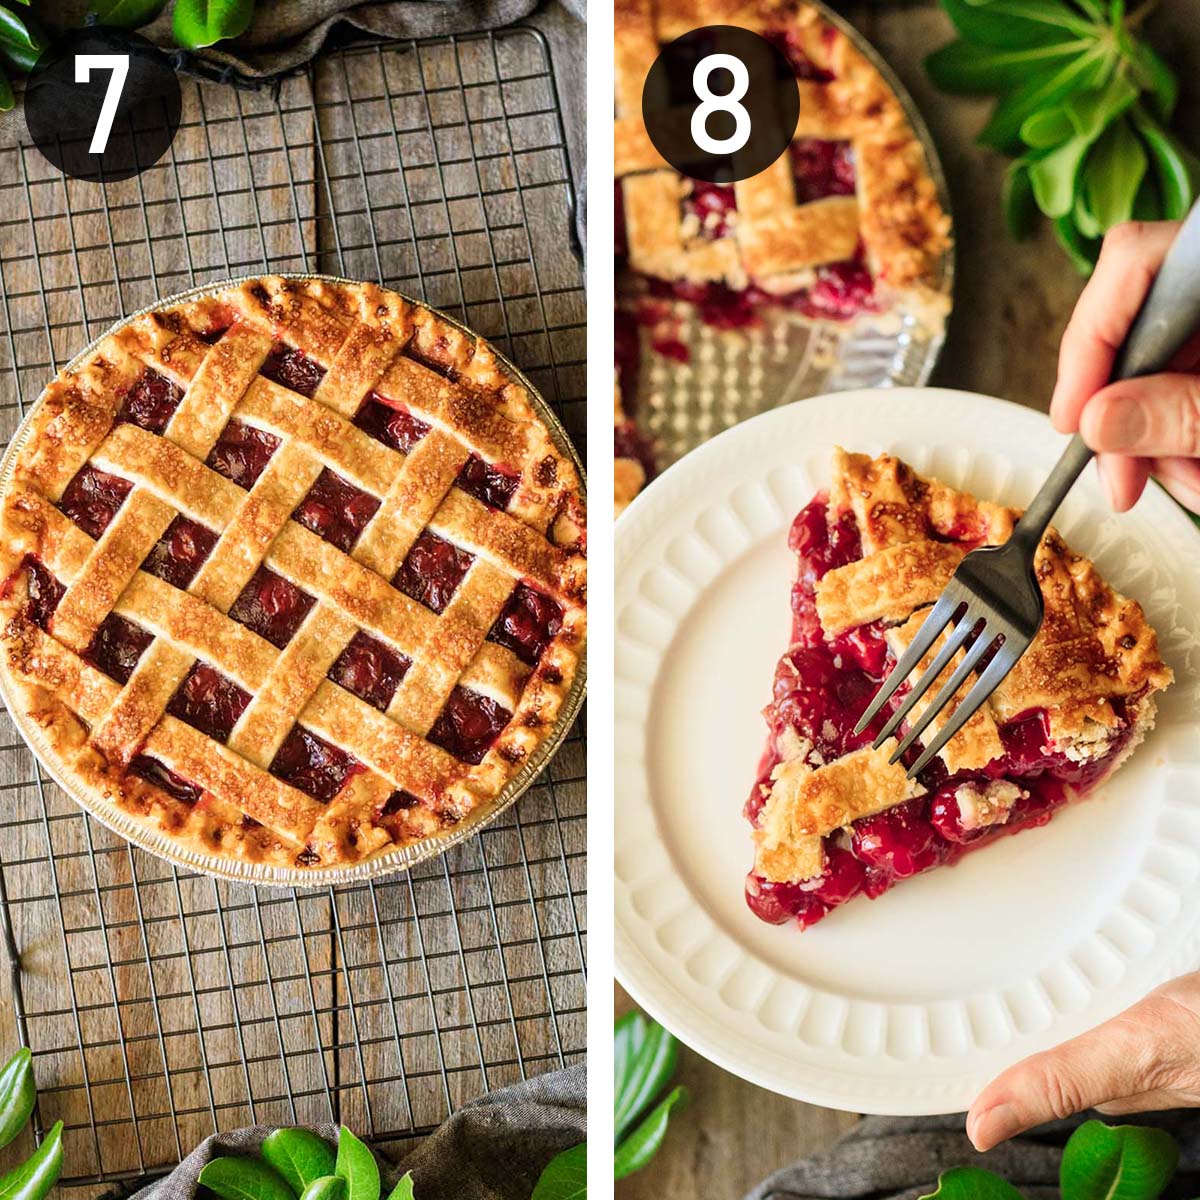
- Bake at 400°F for 20 minutes, then lower the heat to 375°F and bake for another 20 minutes. Cover the pastry with foil if it's getting too dark.
- Let it cool completely on a wire rack before slicing and serving, about 4 hours. Serve with vanilla ice cream.
Sour Cherry Pie FAQs
Yes, while you wouldn't want to eat sour cherries on their own, they're perfect in a pie! If you're using fresh sour cherries, look for Morello or Amarella ones.
No, I don't recommend it. Sour cherries are best but if you do use this kind, cut down the sugar in the recipe to ½ cup.
The best way to thicken it is with cornstarch. Start by whisking the cornstarch with some water, sugar, lemon juice, and salt over medium heat until dissolved.
Keep whisking and cooking until the mixture just comes to a boil and thickens. Be patient--it will take a few minutes!
Don't have cornstarch? Try using all-purpose flour, arrowroot, or quick-cooking tapioca.
No. Use them straight from the freezer -- there's no need to defrost or drain them first.
Make Ahead: Bake up to a day in advance. Cover the cooled pie with foil, then store at room temperature for up to 2 days or in the fridge for 4-5 days.
Reheat: Place in a 200°F oven until warmed through, about 20 minutes. Be aware that hot filling will be more liquidy.
To freeze before baking, wrap the uncooked pie in plastic and aluminum foil and freeze.
To freeze after baking, let the pie cool completely, then wrap in plastic wrap and foil or place in a freezer bag and freeze for up to 3 months. Defrost at room temperature.
To bake a frozen uncooked pie, unwrap the frozen pie and re-cover with fresh plastic. Defrost in the fridge, then let it sit on the counter for an hour or so before baking.
Serving Suggestions
If you're looking for other tasty dessert recipes, try our recipes for Southern buttermilk pie or sour cherry pie. You'll also want to try our sour cream pound cake and cranberry apple galette, too!
If you're looking for savory sides and mains that would go well with this pie, you'll want to try our Southern baked beans, potato salad, and broccoli salad. Our Chick-fil-A coleslaw and Italian pasta salad are always crowd pleasers, too!
Expert Tips
- Always use sour cherries. Canned sweet ones just don't taste as good in a cherry pie as the tart ones.
- Speed up the process by using canned cherries. It's much quicker and easier than pitting fresh ones!
- Adjust the amount of almond extract to taste. It's always good to taste and see how you like it.
- Watch the pastry carefully towards the end of the baking time. The filling can bubble and discolor the pastry, or it can burn.
- Let it cool completely before slicing and serving. Otherwise, the filling will be runny.
More Pies You'll Love


Recipe

Sour Cherry Pie
Ingredients
For the Cherry Filling
- 2 15-ounce cans sour cherries in water
- ½ cup liquid from canned cherries
- 1 cup granulated sugar
- 3 tablespoons cornstarch
- 1 tablespoon lemon juice
- ¼ teaspoon salt
- 1 tablespoon unsalted butter
- ½ teaspoon almond extract
For the Pastry & Decoration
- 15 ounces flaky shortcrust pastry
- 1 large egg, beaten
- 2 tablespoons demerara sugar, optional
Instructions
- Preheat the oven to 400°F. Place a large rimmed baking sheet in the oven to preheat.
- Open the cans of cherries and drain them, reserving the juice from one can. You'll need ½ cup of liquid.
- Pour the liquid, sugar, cornstarch, lemon juice, and salt into a 2-quart saucepan and set over medium heat. Whisk constantly over the heat until the mixture is boiling and has thickened. This will take a few minutes, so be patient. You'll know the mixture is thickening when globs suddenly appear in the mixture.
- Remove from the heat and whisk in the almond extract and butter until smooth and well blended. Gently fold in the drained cherries with a flexible spatula, then set aside to cool.
- Roll the chilled pastry on a lightly floured surface until it's about ⅛-inch thick. Use it to line a 9-inch metal pie plate, then trim off the excess pastry with a knife. Gently spread the cooled cherry filling in the pastry.
- Wad up the remaining pastry and re-roll it to about ⅛-inch thick. Cut into strips, using a ruler for straight lines. Lay several of the strips horizontally across the top, then weave the remaining strips under and over the other ones to create a lattice top. Cut off the excess pastry, crimp the crust, and brush the pastry with beaten egg. Sprinkle liberally with demerara sugar if desired.
- Bake at 400°F for 20 minutes, then reduce the heat to 375°F and bake for another 20 minutes. The crust should brown beautifully and the filling should bubble gently.
- Remove the pie from the oven and let it cool for 3-4 hours on a wire cooling rack to allow the filling to cool and set. Cutting it too soon will make the filling runny.
- Serve with vanilla ice cream.
Notes
- Use sour cherries. Sweet cherries don't taste as good in this recipe.
- Use canned cherries to save time.
- Adjust the almond extract to taste.
- Watch it carefully towards the end of the baking time to see if the filling is bubbling or the pastry getting too dark.
- Let it cool completely before slicing and serving, or the filling will not be set.
Nutrition
Serving sizes and nutritional information are only an estimate and may vary from your results.
Beth
Cherry 🍒 pie is so good! I think that the demerara sugar adds a bit of crunch to the top of the pie. The tart cherries are really good! I like them almost as much as I like fresh cherries. The lattice on yours looks amazing 😉😊.
Emma
Thank you, Beth! The sour cherries really make the pie delicious. 😉