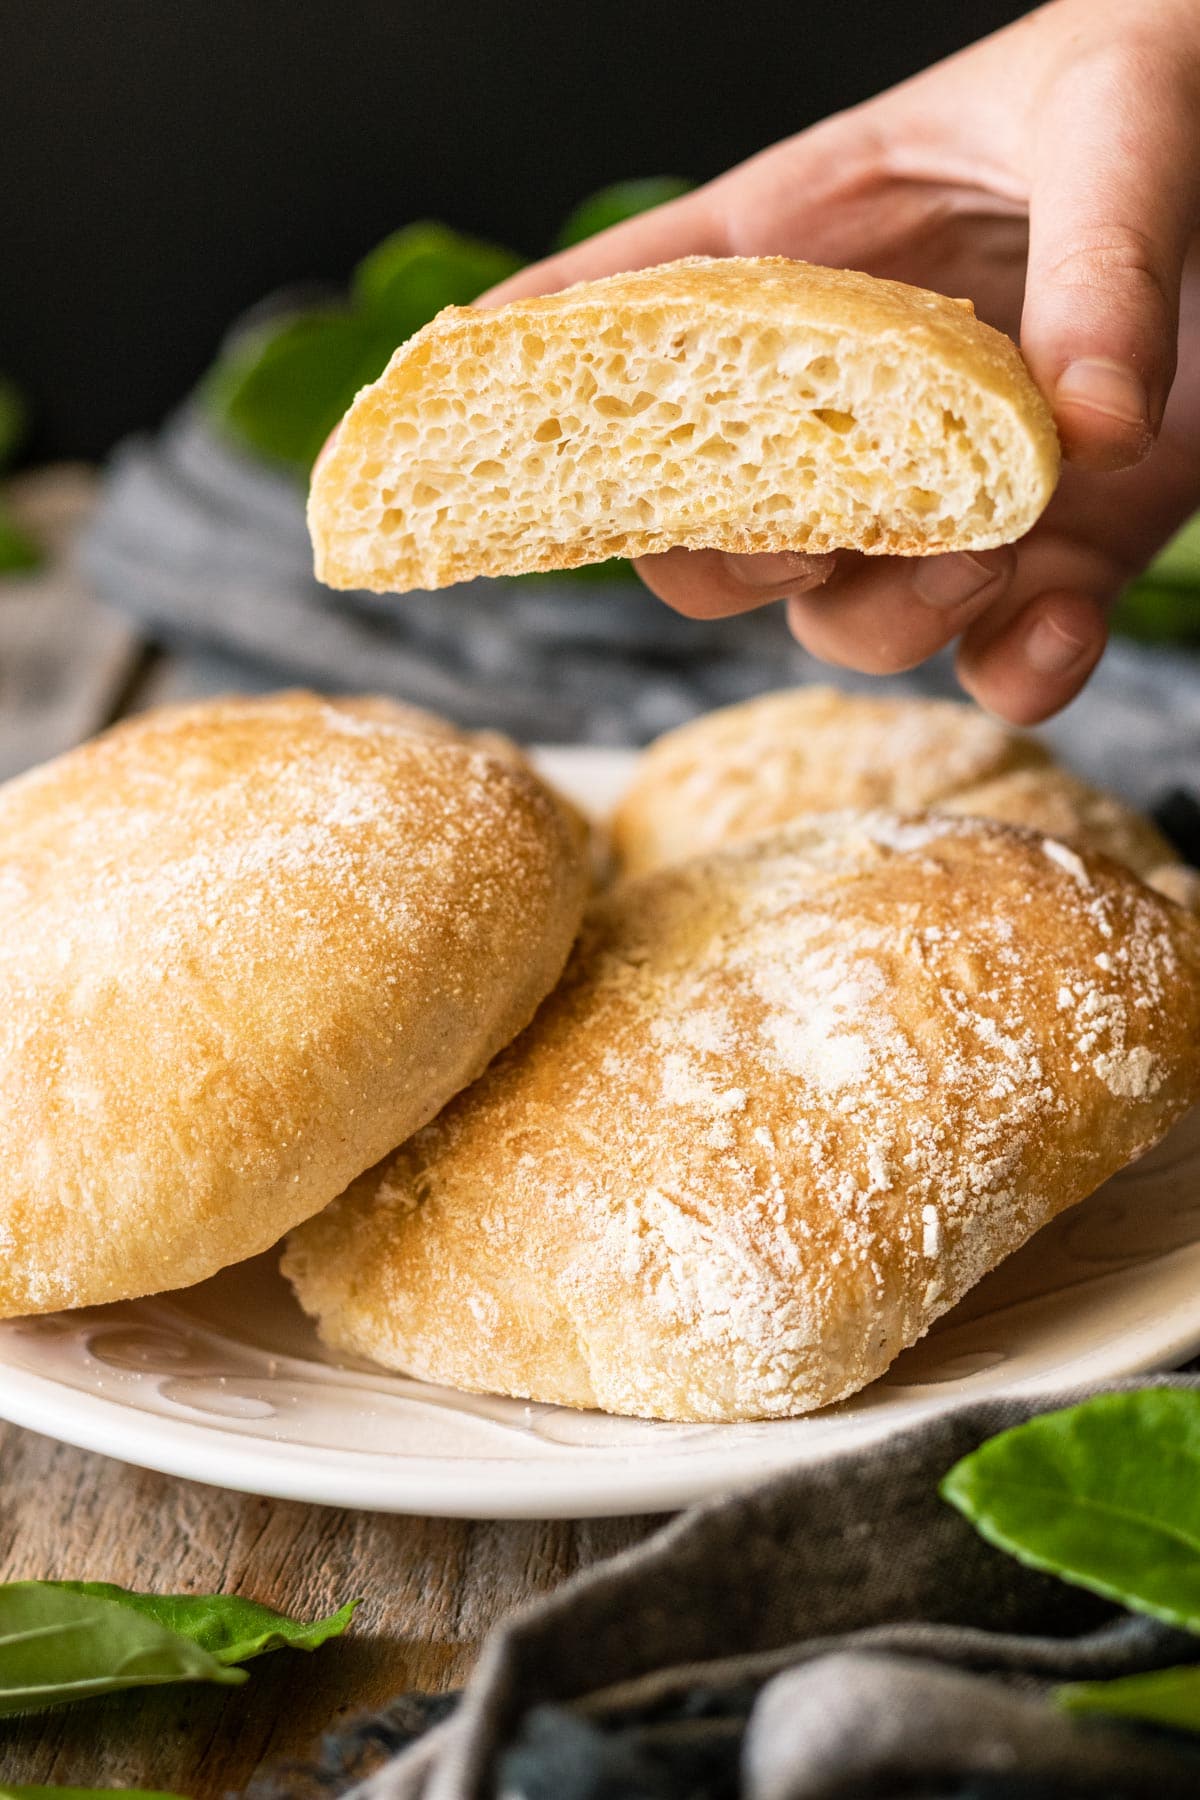
Have you ever tried ciabatta bread? This rustic Italian bread tastes amazing when made into a sandwich--which is why I made mine in individual ciabatta rolls instead of the traditional elongated loaves. I've skipped the biga, or overnight starter, to speed up the process, so these rolls can be on your table tonight!
Love homemade rolls for sandwiches? Check out these great recipes for Waterford blaa buns and Mexican telera rolls.
Quick Look at Ciabatta Rolls Recipe
- ⏲️ Prep Time: 40 minutes
- ⏲️ Cook Time: 40 minutes
- ⏲️ Total Time: 3 hours 50 minutes (including 2 hours 30 minutes rising time)
- 🍽️ Yield: 10 large ciabatta rolls
- 🥕 Dietary Info: Vegan, Vegetarian, Dairy Free
- ⚡ Calories: 220 calories per serving (based on nutrition facts in recipe card)
- 🌾 5 Ingredients: bread flour, salt, yeast, olive oil, and water.
- 🥣 Method: Oven Baked
- ⌛ Time-Saving Hack: Use a stand mixer to make the dough; it's very wet and sticky, and will make cleanup easier.
- 🔪 Equipment: stand mixer, 9x13-inch cake pan, pastry brush, and bench scraper.
- ⭐ Expert Tip: The key to a good ciabatta is a slow prove. It gives the dough a much better flavor and an irregular, open crumb structure (mix of larger and smaller air holes).
- 🥖 Flavor & Texture: These chewy ciabatta rolls have a thin, crispy crust and a soft interior with a mix of larger and smaller air holes. They're ideal for sandwiches.
Summarize or save this content on
Why You'll Love This Recipe
- Quicker to Make: This recipe skips the overnight starter dough, or biga, and makes ciabatta rolls you can enjoy the same day.
- Perfect for Sandwiches: These ciabatta rolls have a thin, crispy crust and soft, chewy interior with lots of air holes.
- Made with 5 Simple Ingredients: You probably already have all the ingredients on hand!
Featured Comment
⭐⭐⭐⭐⭐ "I just made these rolls for the first time. Loved how easy it was. They came out looking wonderful. Can't wait for dinner. Thanks so much for this recipe."
- Kathy
Jump to:
Ingredients
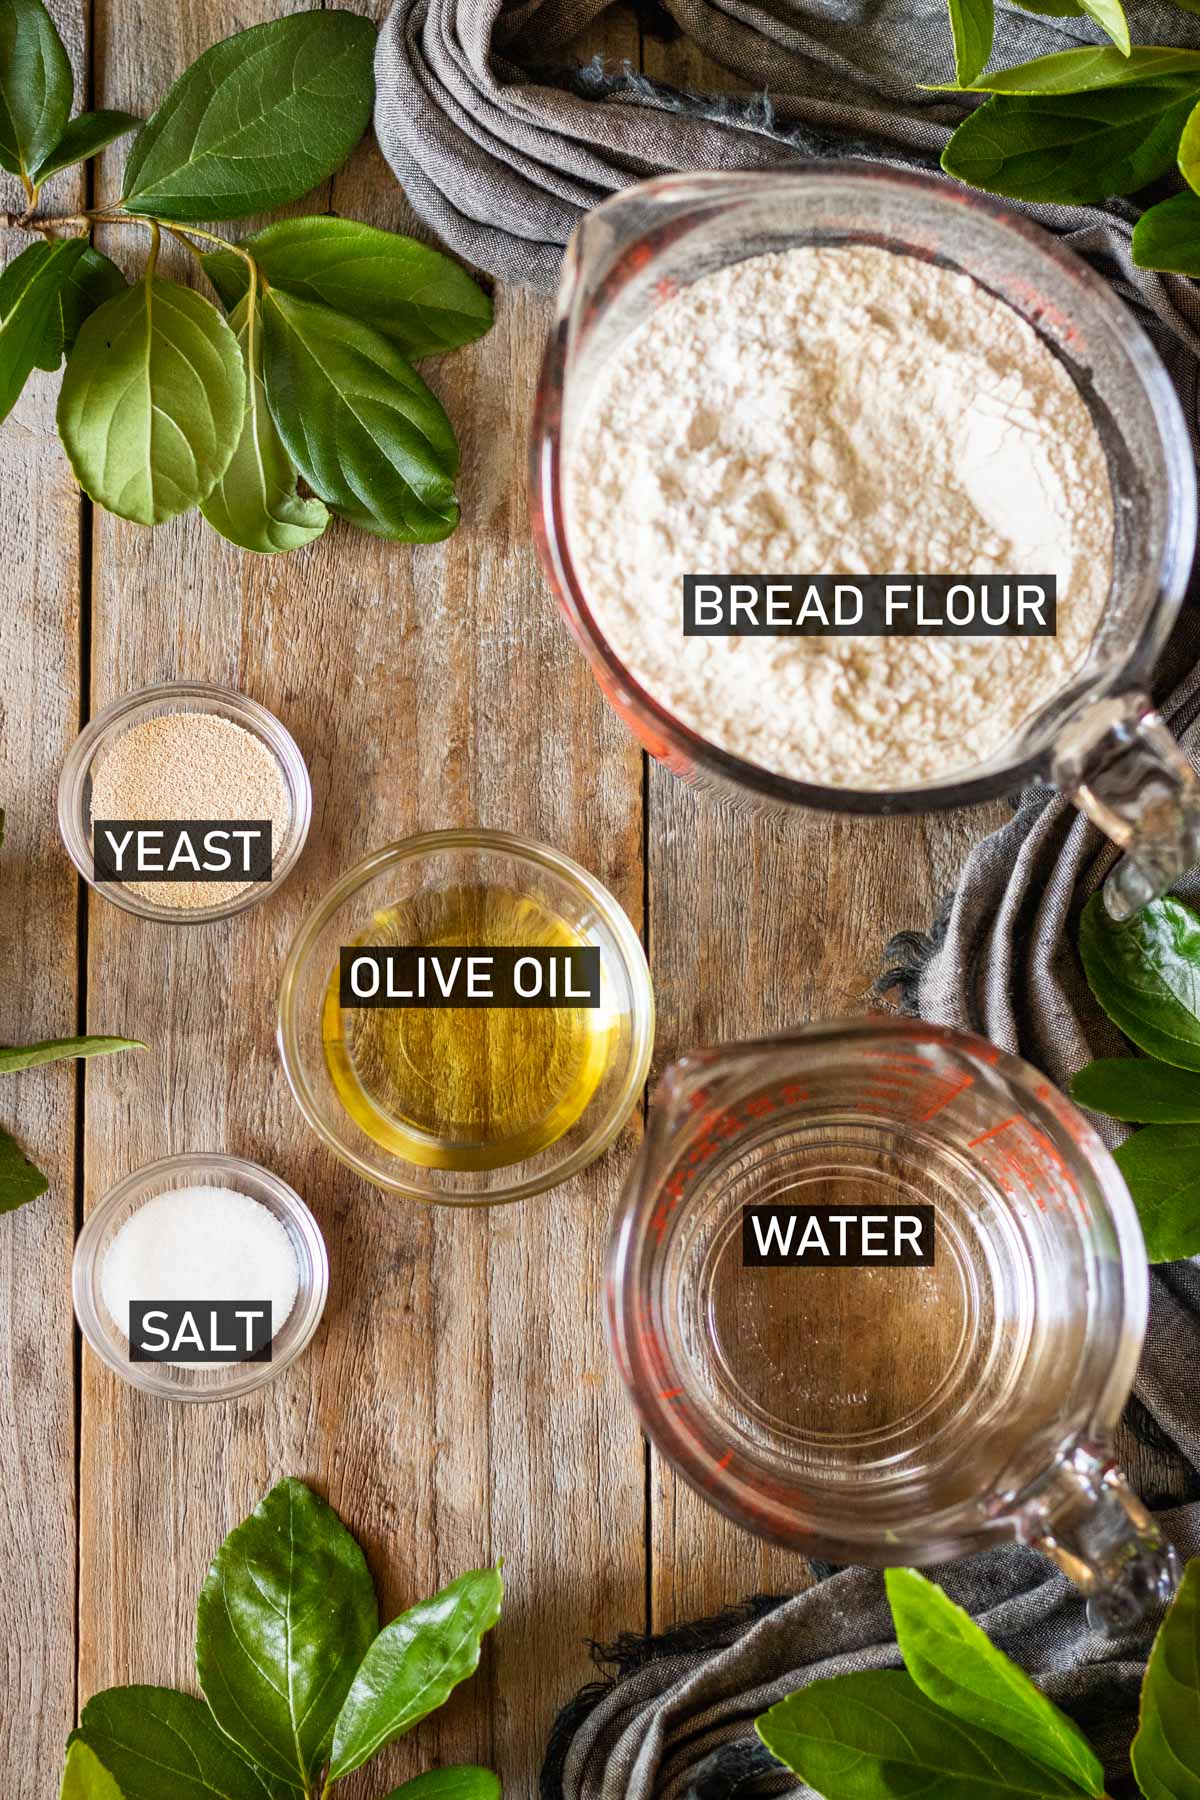
Curious what ingredients you'll need to make ciabatta rolls? You'll only need 5 simple ingredients to whip up a batch of this delicious homemade bread!
- Bread Flour: It's really important that you use bread flour for this recipe. It has a higher protein content than all-purpose, which will create more gluten. This strengthens the ciabatta's structure, enabling it to rise better and have a chewy texture.
- Yeast: I like to use fast-action (aka instant) yeast because it allows me to skip the 10-minute blooming in warm water and sugar that active dry requires. Feel free to use whichever type you prefer.
- Salt: This ingredient adds flavor and keeps the yeast from working too quickly. Use fine table salt so it will incorporate easily into the mixture.
- Olive Oil: This adds a little richness and flavor.
- Water: This ciabatta is almost at 100% hydration, so you'll need almost equal weights of water and flour. Although this makes it super sticky, it is a must if you want the open crumb structure ciabatta is known for.
See recipe card for full information on ingredients and quantities.
How to Make Ciabatta Rolls
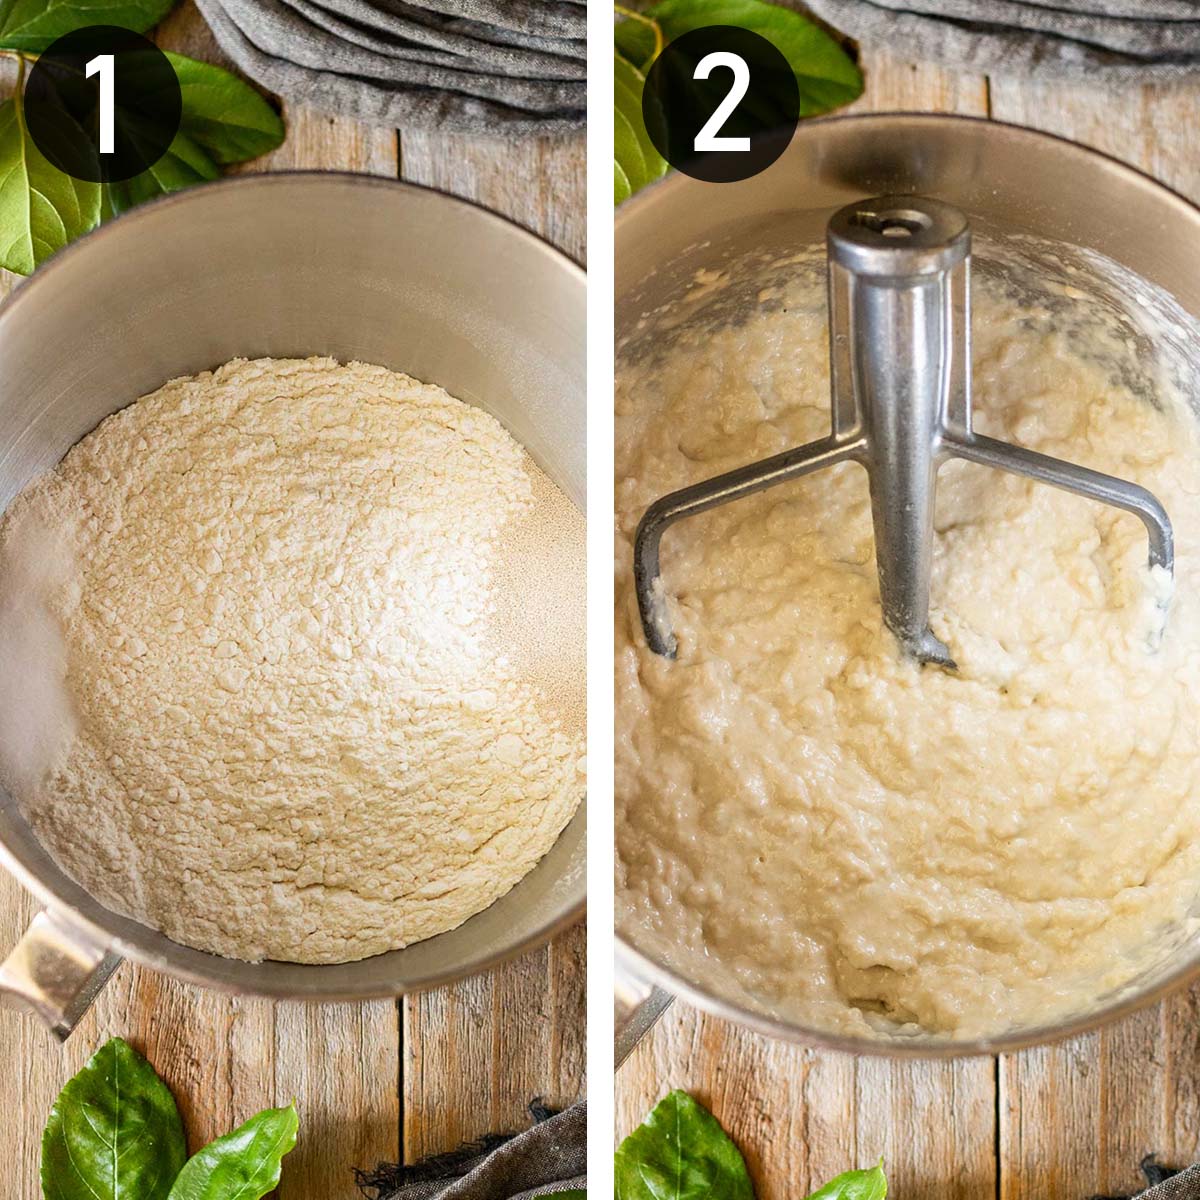
- Pour the flour into a mixing bowl, then add the salt and yeast on opposite sides and stir each one in with your finger. (image 1)
- Add the oil and water, mixing until a very sticky mixture forms. It should have the consistency of a very thick batter. (image 2)

- Cover the bowl with a kitchen towel and let the dough rest for 30 minutes. (image 3)
- Knead for 4-5 minutes with the paddle attachment on low speed. It's kneaded enough when it can stretch 3-4 inches without breaking. (Do not try to knead by hand; it's far too sticky for that! Also, don't add flour during the kneading.) (image 4)
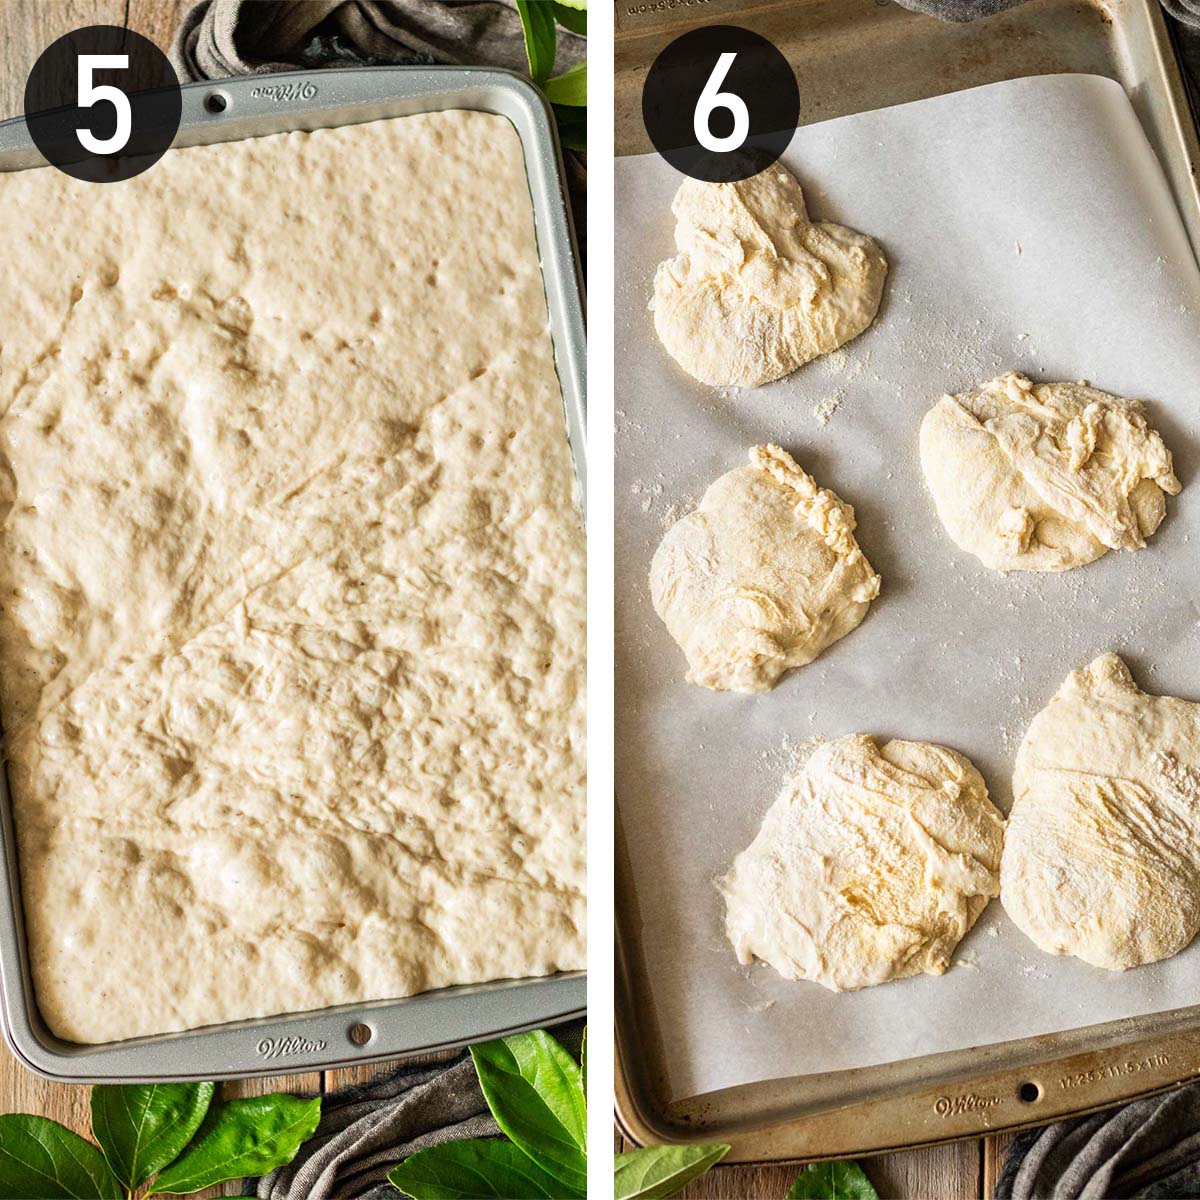
- Pour the dough into a greased 9x13-inch cake pan and cover with greased plastic wrap. Let it rise at room temperature until it's at least doubled in size, about 2 hours. (image 5)
- Shape the rolls on a generously floured surface and place gently on a parchment-lined tray. Let the rolls rise for 20-30 minutes, or until they barely spring back when prodded. (image 6)
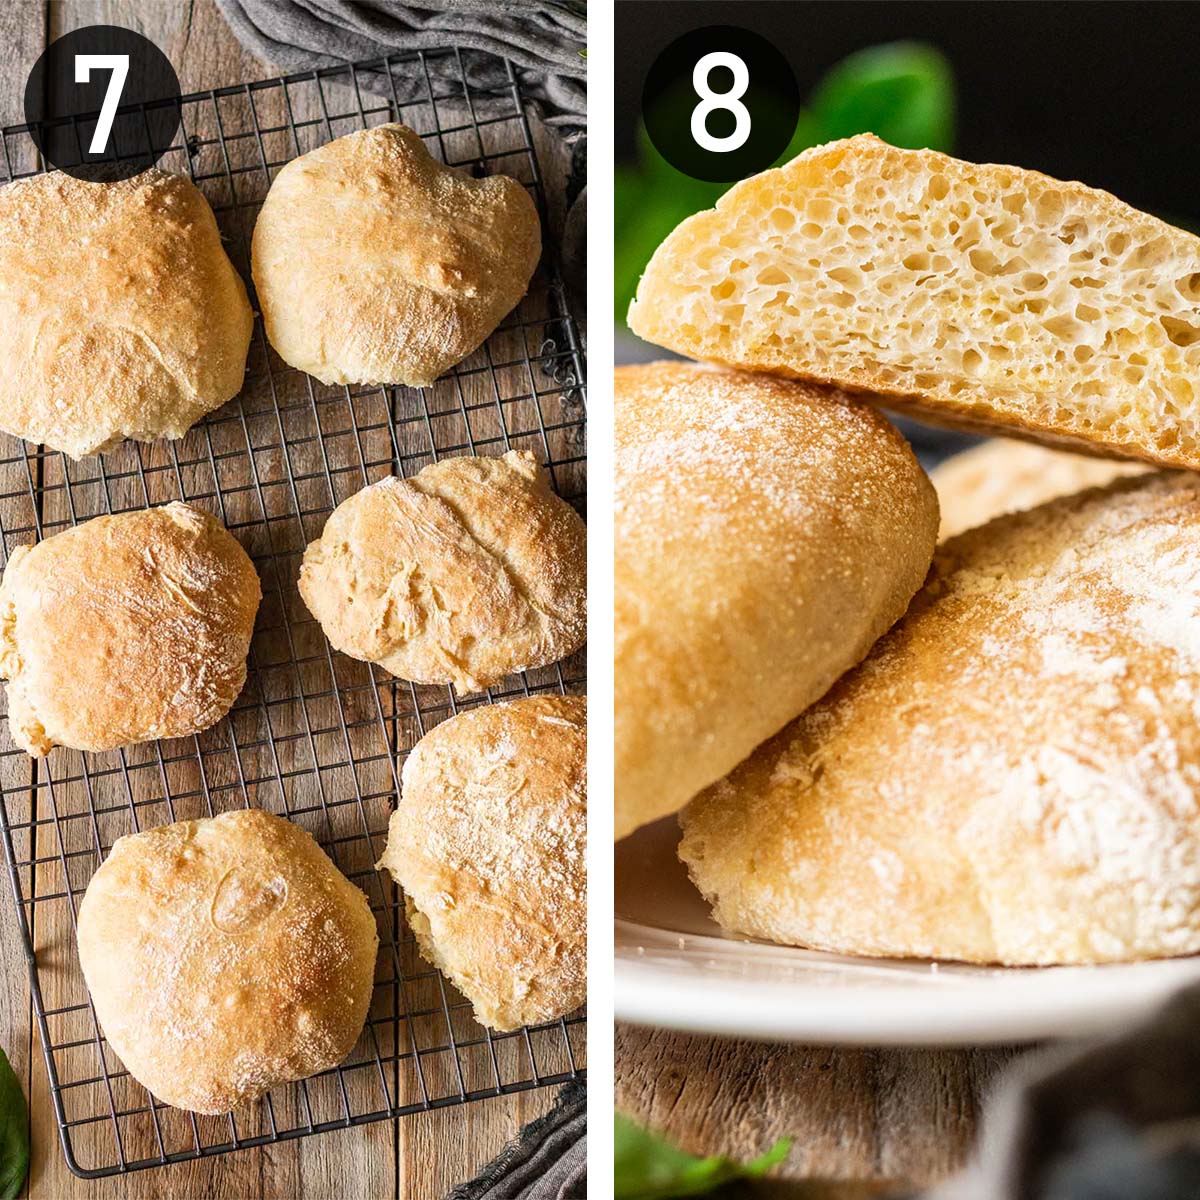
- Bake at 415°F for 15-20 minutes, or until the rolls are browned. Let the rolls cool for 30 minutes on a wire rack before slicing and serving. (image 7)
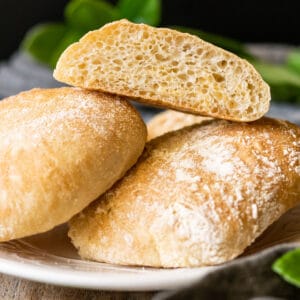
- Use these ciabatta rolls to make your favorite sandwiches, or enjoy them spread with butter or with a bowl of soup. (image 8)
Ciabatta Rolls FAQs
The biggest difference is that ciabatta is made from a much wetter dough. Ciabatta can be 90-100% hydration, which means there's almost as much water in the recipe as flour by weight. The higher hydration allows the air pockets inside to be much larger and more irregular, creating the distinctive appearance ciabatta is well known for.
Ciabatta rolls make wonderful sandwiches, as almost any flavorful filling goes well with them--especially Italian meats and cheeses. Other ways to use ciabatta rolls are to serve along with soup and salad, or simply to tear it into smaller pieces and dip into a bowl of extra virgin olive oil with freshly cracked black pepper.
Ciabatta tastes very similar to other white breads. What makes it unique is its thin, crispy crust and its airy and chewy texture. Ciabatta made with a biga (overnight starter) or sourdough will have a distinct sour flavor, unlike those traditionally leavened.
Ciabatta rolls are healthy when eaten in moderation. This recipe contains basic, all-natural ingredients: white flour, salt, yeast, olive oil, and water. One individual-sized roll is 207 calories, and contains 6.3g of protein and only 3.7g of fat. See the nutrition information at the end of this post for more details.
Serving Suggestions
If you're looking for more tasty bread recipes, make sure to try our recipes for Waterford blaas, Irish brown bread, and boxty bread. You'll also want to try our recipes for telera rolls and pumpkin dinner rolls.

Expert Tips
- Use a stand mixer. The dough is incredibly wet and sticky, and will be difficult to work with by hand.
- Prove slowly. This ensures a good flavor in the rolls. If it's rising too fast in a hot room, you can even refrigerate it.
- Is the risen dough falling? This is a sign that you should start shaping the rolls right away.
- Use lots of flour on the work surface when shaping the rolls, or it will deflate the rolls and make a mess.
- Don't have cornmeal? Use semolina or grits instead.
More Savory Bread Recipes


Recipe
Easy Ciabatta Rolls
Ingredients
- 4⅛ cups bread flour
- 2 teaspoons salt
- 2¼ teaspoons fast-action yeast
- 2 tablespoons olive oil
- 2 cups room-temperature water
- Cornmeal and extra flour for dusting
Instructions
Making the Dough
- Dump the bread flour into the bowl of a stand mixer. Add the salt and yeast on opposite sides of the bowl, then stir in each one with your finger. The salt can kill or slow down the yeast's growth if it touches the yeast directly.
- Pour the olive oil and half of the water onto the flour and begin mixing with the paddle attachment on low speed. Trickle in the remaining water until the mixture is extremely sticky and is about the consistency of a very thick batter. You might not need all the water.
- Cover the bowl with a kitchen towel and let it rest at room temperature for 30 minutes.
- Knead on medium speed with the paddle attachment for about 4-5 minutes, until the dough can stretch 3-4 inches without breaking.
- Lightly grease a rectangular plastic container or 9x13-inch pan with olive oil, then pour the dough into the container. Cover with greased plastic wrap and allow to prove at room temperature until at least doubled in size, about 2 hours.
Shaping the Buns
- Preheat the oven to 415°F. Line two 11 by 17-inch cookie sheets with parchment paper.
- Generously dust a large wooden cutting board with a thick layer of bread flour and semolina. Carefully turn the plastic container upside down and gently pour the dough onto the floured board.
- Cut the dough in half lengthwise with a bench scraper, then cut each long piece into five smaller pieces to get ten buns. Handle the dough very gently to keep as much air in it as possible. Flour the scraper and your hands as needed, since the dough will be extremely sticky.
- Roughly shape each piece into a square, then gently transfer the buns to the prepared trays. You should have 5 rolls on each tray. Don't worry if they look flat; they'll puff up as they prove and bake. Leave the buns to prove for 20-30 minutes; they will noticeably increase in size.
- Bake each tray one at a time for about 15-20 minutes each. The buns should be crisp, nicely browned, and have an internal temperature of at least 200°F.
- Let the buns cool completely on a wire rack, then serve. Store leftover buns in a zip-top bag at room temperature, or freeze for later.
Video
Notes
- Be sure to use bread flour and not all-purpose for this recipe. You will not get the best results with AP.
- It's best to use a stand mixer to make the dough, since it's so sticky.
- The key to a good ciabatta is a slow prove. If the dough is rising too quickly, put it in a cool place or even in the refrigerator. A long prove gives the dough a much better flavor, and for ciabatta, an irregular, open crumb structure means it will have larger air holes.
- Make sure to immediately start shaping the buns if your risen dough starts to fall.
- If you don't have semolina flour in your cupboard, cornmeal or grits will work just as well for dusting the work surfaces.
Nutrition
Serving sizes and nutritional information are only an estimate and may vary from your results.
Kathy
I just made these rolls for the first time. Loved how easy it was. They came out looking wonderful. Can't wait for dinner. Thanks so much for this recipe
Emma
You're very welcome, Kathy! I hope you enjoyed the ciabatta rolls.
Cheryl
I need clarification about baking the rolls. You state bake rolls one at a time. Wouldn't that cause five of the rolls to be over proofed?
Emma
The recipe states to bake one tray at a time, not each roll individually. This is because the bread doesn't cook as well if both trays are in the oven at the same time. Hope this helps, Cheryl!
CHERYL
Although I didn't state it, I meant one tray at a time. I assume these rolls should be covered while proving? Thank you.
Emma
Yes, you can cover them if you wish. Although I usually do cover breads while they are proving to prevent a tough skin from forming on the surface, I find that these ciabatta rolls prove well even without a cover. The baking time is short enough that the second tray should not be over proved. If you want to slow down the prove, you can always poke the second tray in the fridge while the first one bakes.
CHERYL
Sorry for so many questions, but should I allow them to prove again once removed from the refrigerator?
Emma
No problem, Cheryl! If the buns are springy to the touch, they're ready to bake. The rolls will continue to prove in the fridge; just at a slower pace. Always go by the spring test, not just by time or size.
Erma
Can I use active dry yeast instead in instant?
Emma
Yes, you can use active dry instead. Warm the water in the recipe a little in the microwave, add a teaspoon of sugar and the yeast, and stir to dissolve. Let the mixture stand for until frothy and foamy, about 10 minutes. Then, add the yeast mixture to your ciabatta dough.
Shannon Carpenter
I love this bread! If I want to make a parmesan crust on the outside so I just place the cheese on top of the bread towards the end of the baking or can it be added before I bake it?
Emma
okay...parmesan crust sounds like a dream come true!! 😍 I'd recommend putting the cheese on before baking the ciabbata rolls, then it will stick better to the bread. So glad that you like the rolls!!
Pam bay
Do you have to use salt in ciabatta bread recipe?
Emma
Yes, salt is necessary in the ciabatta rolls to add flavor and to keep the yeast from working too quickly. Happy baking!
Silvia Ruiz
Thanks! I will try to make this ciabatta rolls now.
Emma
I'm excited to hear that you're making the ciabatta rolls, Silvia! I hope that you enjoy them! 🙂
Kate Eaton
I made these as written for use a hamburger buns. They were both beautiful to look at and delicious.
Emma
Thank you so much for your kind review, Kate! I'm thrilled that you enjoyed them. 🙂
Suzanne Hoffman
I can't wait try these. I've shared the recipe with some friends who love to make bread. Your recipes are so well presented, Emma.
Emma
Thank you so much, Suzanne! Please leave a review when you make the ciabatta rolls! 🙂
Lida Sauve
I’m not a frequent baker but I made these just as described and they were excellent! I didn’t achieve square shape so mine were round but still good
Emma
I'm thrilled that you enjoyed them! Thanks so much for making them! I'm honored that you chose these ciabatta rolls as your baking project. 🙂
Susanne Sams
When you say to stir the yeast and salt with your finger do you mean keep each one on its side of the bowl when stirring or do you mean just keep them separate when putting into bowl but stir them at the same time while combining with the flour. I should know this as I’ve made Italian bread before with this method but I’ve forgotten the correct method.
Emma
Good question, Susanne! When you stir in the salt and yeast, just keep each one on its side of the bowl so they don't touch each other. Hope this helps!
Tony
Hi. You say to lightly grease a 10-cup square or rectangular plastic container. Could you be more specific in WxLxH in inches please? Don’t understand 10 cup container--new to baking.
Regards,
Tony
Emma
Good question, Tony! I used a container that measured 6x9 inches and was 2.5 inches deep. Also, the 10-cup capacity refers to how much liquid the container can hold. Hope this helps!
Dina Dreifuerst
Fun recipe - I look forward to trying it. Just one thing: it's "proof" or "proofing" bread dough, not "prove" 🙂
Emma
I'm glad you're looking forward to making these ciabatta rolls! Actually, "prove" and "proof" mean exactly the same thing--they're just different terms. 😊