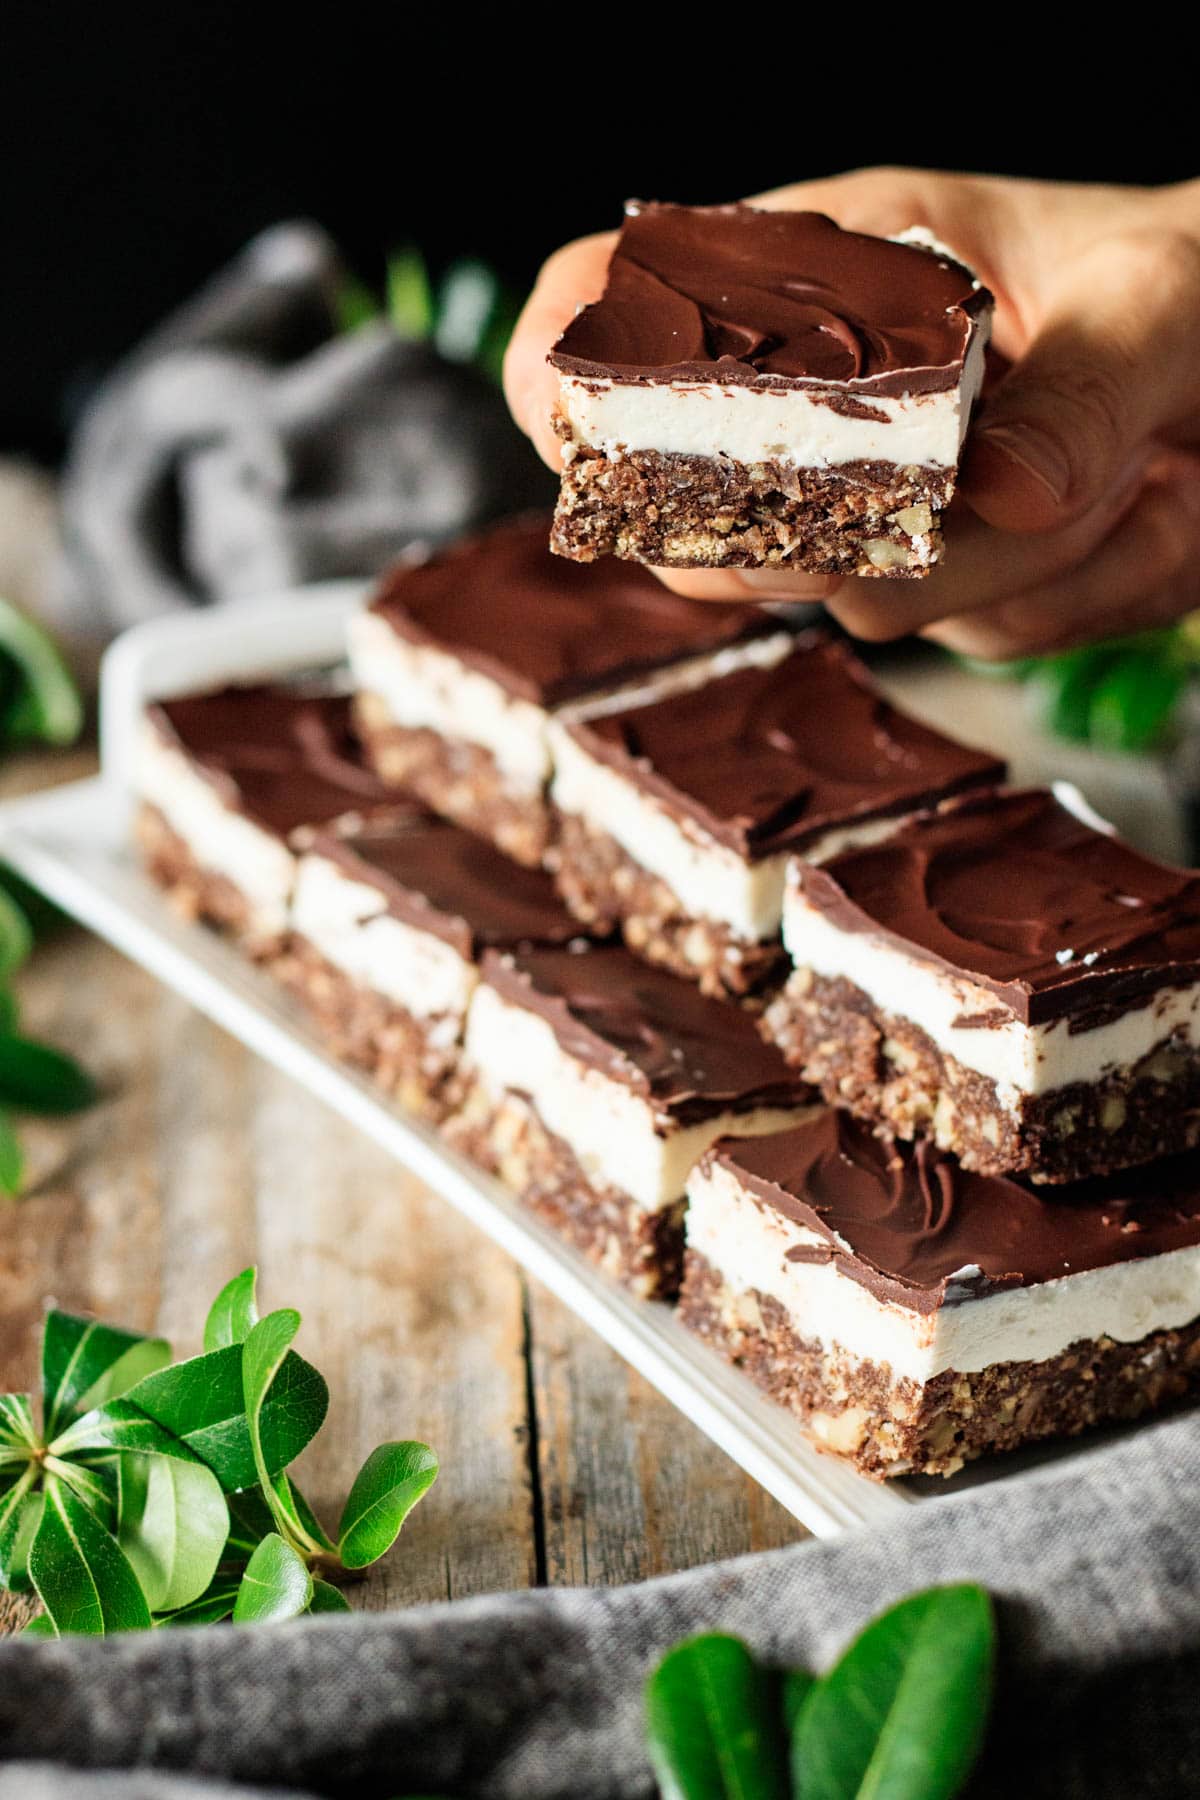
Chocolate, coconut, butter, and vanilla are made into one attractive and memorable dessert: Nanaimo bars. This classic Canadian treat will be popular with your family and friends!
If you love no bake desserts, you'll love these no bake cookies and chocolate peanut butter fudge.
Quick Look at the Recipe
- ⏲️ Prep Time: 1 hour 5 minutes
- ⏲️ Total Time: 2 hours 20 minutes (including 1 hour 15 minutes of chilling time)
- 🍽️ Yield: 32 bars
- 🥕 Dietary Info: Vegetarian; can be made Gluten Free & Dairy Free
- ⚡ Calories: 176 calories per serving (based on nutrition facts in recipe card)
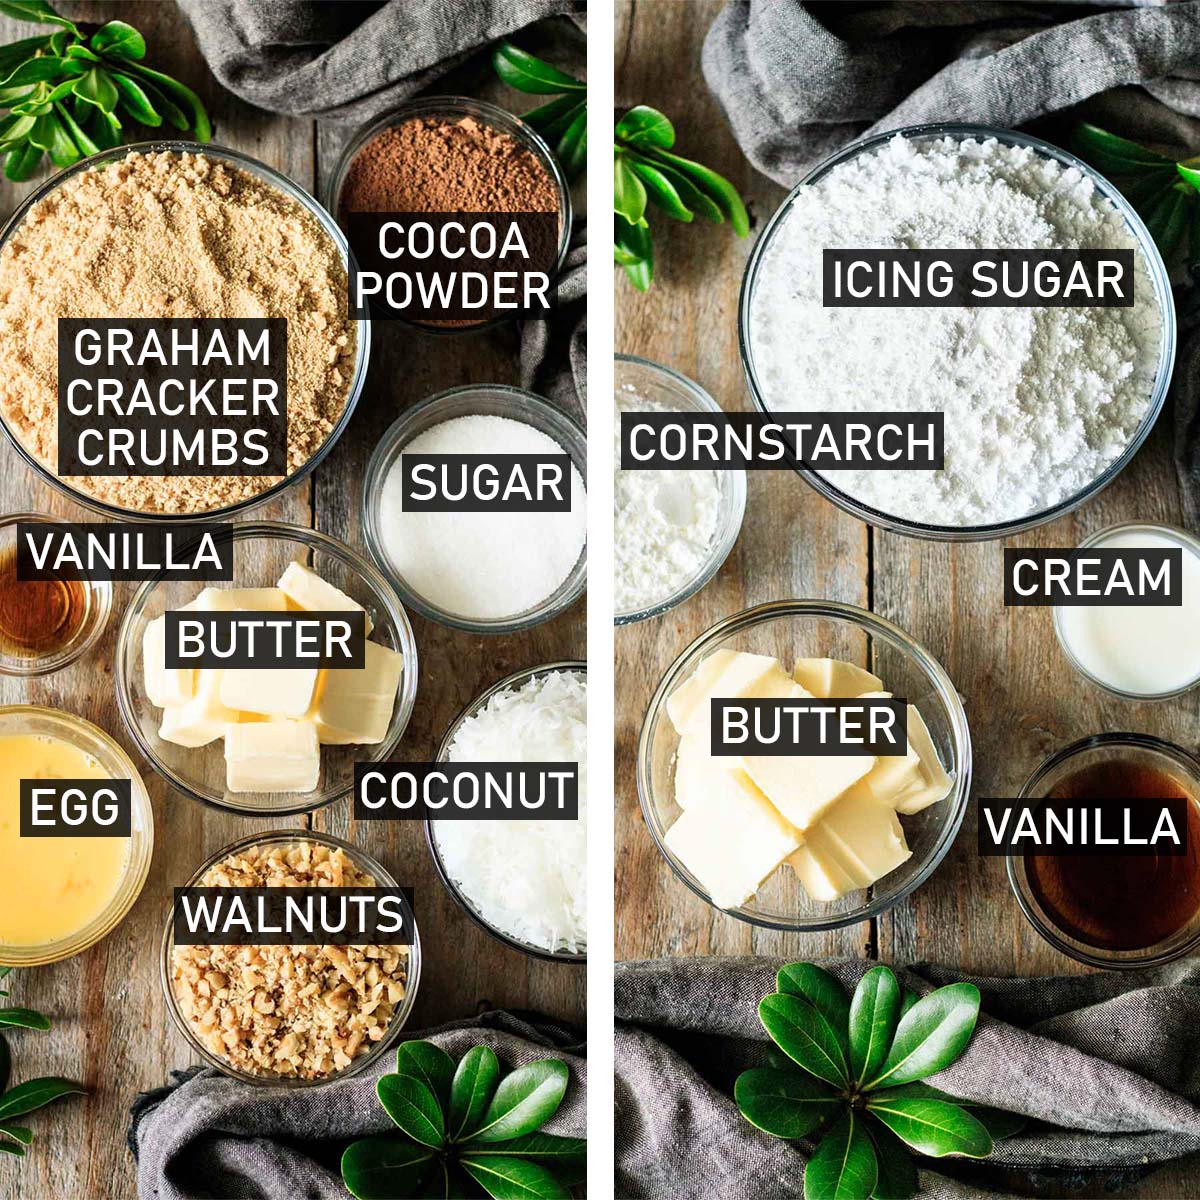
- 🧈 12 Ingredients: graham cracker crumbs, coconut flakes, walnuts, unsalted butter, sugar, cocoa powder, vanilla extract, egg, icing sugar, cornstarch, heavy cream, and dark chocolate.
- 🥣 Method: No Bake (Refrigerator)
- ⌛ Time-Saving Hack: Chill the bars in the freezer instead of the fridge for a quicker chilling time.
- 🔪 Equipment: 8x8-inch cake pan, parchment paper, and digital thermometer.
- ⭐ Expert Tip: Use a hot knife to cut the Nanaimo bars into squares to reduce the chocolate from cracking.
- 🍫 Flavor & Texture: These Nanaimo bars have a textured chocolate and coconut base, creamy vanilla center, and crunchy chocolate topping. You'll love these tasty bars!
Summarize or save this content on
Why You'll Love This Recipe
- Classic 3-Layer Canadian Treat: The chewy graham cracker, coconut and walnut base, creamy vanilla filling, and smooth chocolate top give every bite a delightful contrast of textures.
- No Oven Needed: Because these bars are entirely no-bake, they're perfect for warm weather days or when you just want a show-stopping dessert without firing up the oven.
- No Custard Powder Required: This version omits the Bird's custard powder so you can still make delicious Nanaimo bars even if you don't have any on hand.
- Make-Ahead Friendly: These bars set up in the fridge and store well, so you can prepare them in advance for holidays, parties, or sweets boxes.
Featured Comment
⭐⭐⭐⭐⭐ "These Nanaimo bars are creamy, crunchy, and sweet with the vanilla icing. I love these DIVINE bars!! ❤"
- Alex
Jump to:
Ingredients
Curious what you need to make a batch of delicious Nanaimo bars at home? Let's talk about the key ingredients before you get baking.
- Graham Cracker Crumbs: These crushed cookies hold the base together. Make your own or use ready made.
- Butter: Real butter is used in all three layers of this dessert to add flavor and richness. Since butter hardens in the fridge, it also encourages them to set.
- Walnuts: Chopped nuts add extra crunch to the base.
- Chocolate: The top layer consists of melted chocolate that's spread on top of the buttercream filling.
See recipe card for full information on ingredients and quantities.
How to Make Nanaimo Bars

- Make your own graham cracker crumbs by breaking the crackers into smaller pieces and sealing them inside of a zip-top bag. Crush with a rolling pin until the crumbs are small and all the same size. (image 1)
- Mix together the coconut, graham cracker crumbs, and chopped walnuts until combined. (image 2)

- Dump the butter, sugar, cocoa powder, vanilla, and egg into a heatproof bowl and set over a saucepan of gently simmering water. Stir the mixture until the butter has melted and the mixture is smooth and thickened. It should reach about 155°F (68°C) on a thermometer. (image 3)
- Once the chocolate mixture has thickened, pour it all into the graham cracker mixture and mix well. Feel free to get your hands in the bowl to mix; it's a lot easier than using a spoon. (image 4)
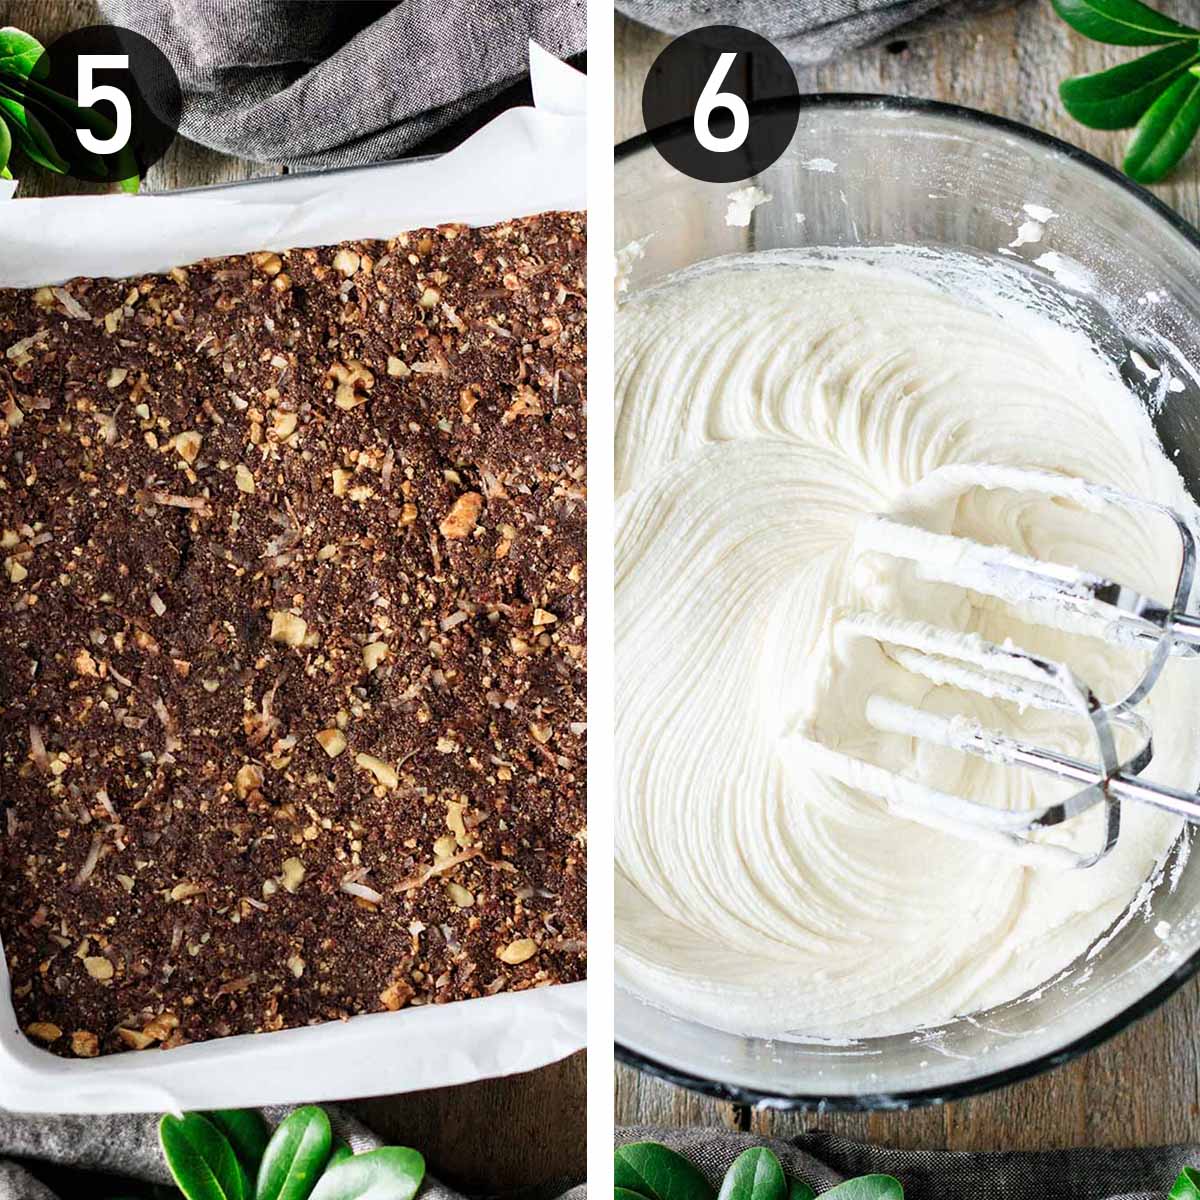
- Lightly butter an 8x8-inch cake pan, then line it with parchment paper. Pack the chocolate graham mixture into the pan and chill for at least 30 minutes. (image 5)
- While the base is chilling, make the vanilla filling. Dump the butter into a mixing bowl and sift in the icing sugar. Add the cornstarch and vanilla extract and beat until smooth. Add enough heavy cream to make the icing a stiff but spreadable texture. Keep beating the icing on medium speed until it's really smooth and fluffy. (image 6)
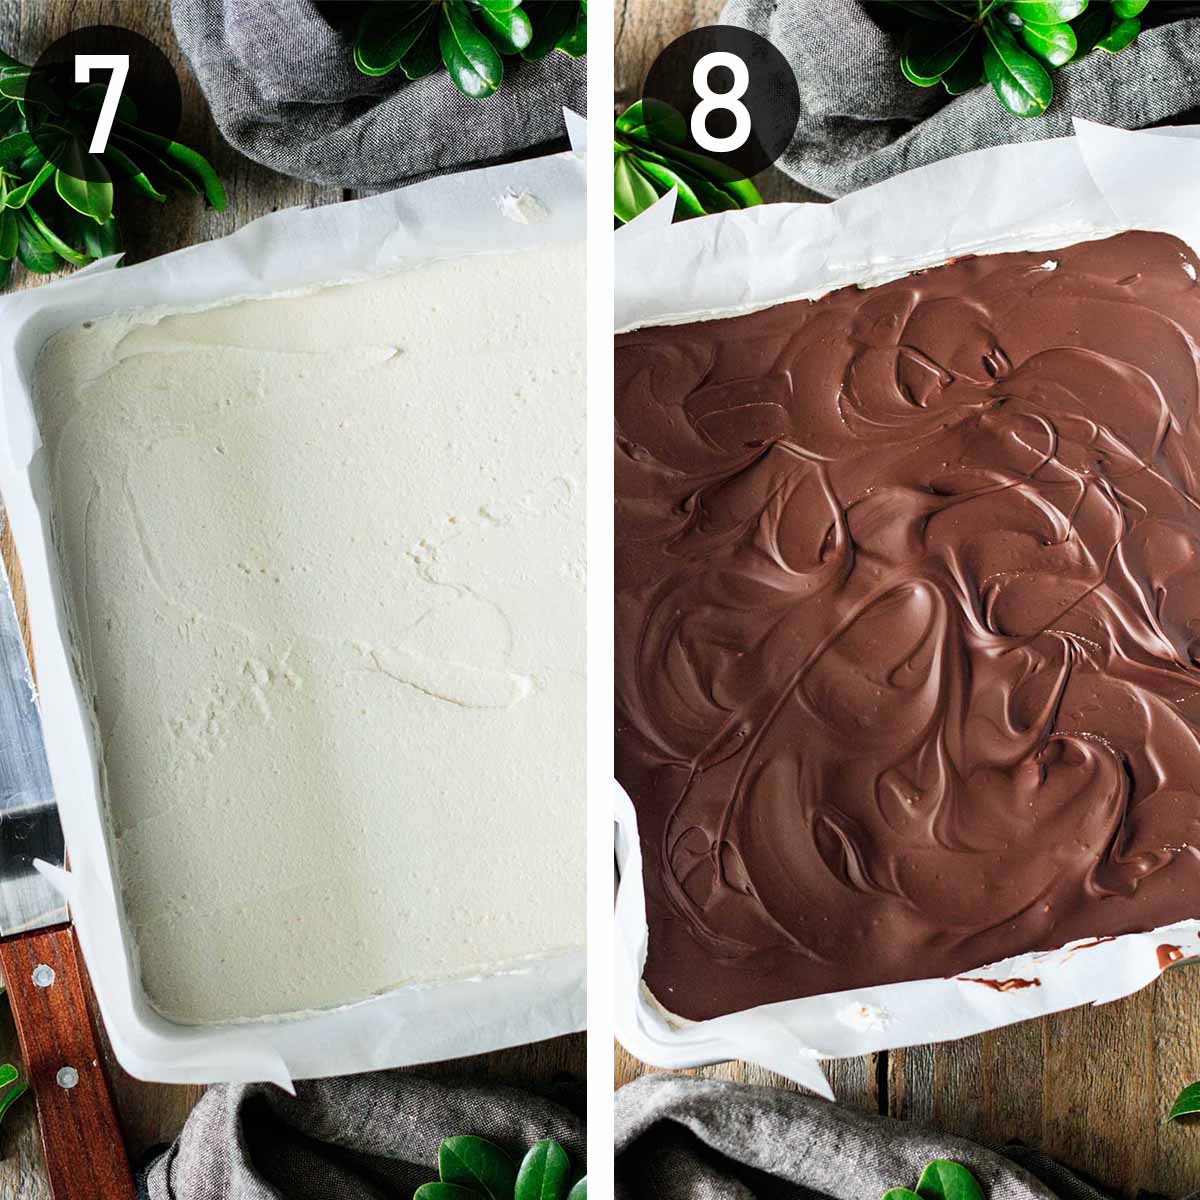
- Spread the vanilla filling on the chilled base. Chill again for at least 15 minutes. (image 7)
- Melt the chocolate and butter together in a heatproof bowl set over a saucepan of gently simmering water. (image 8)
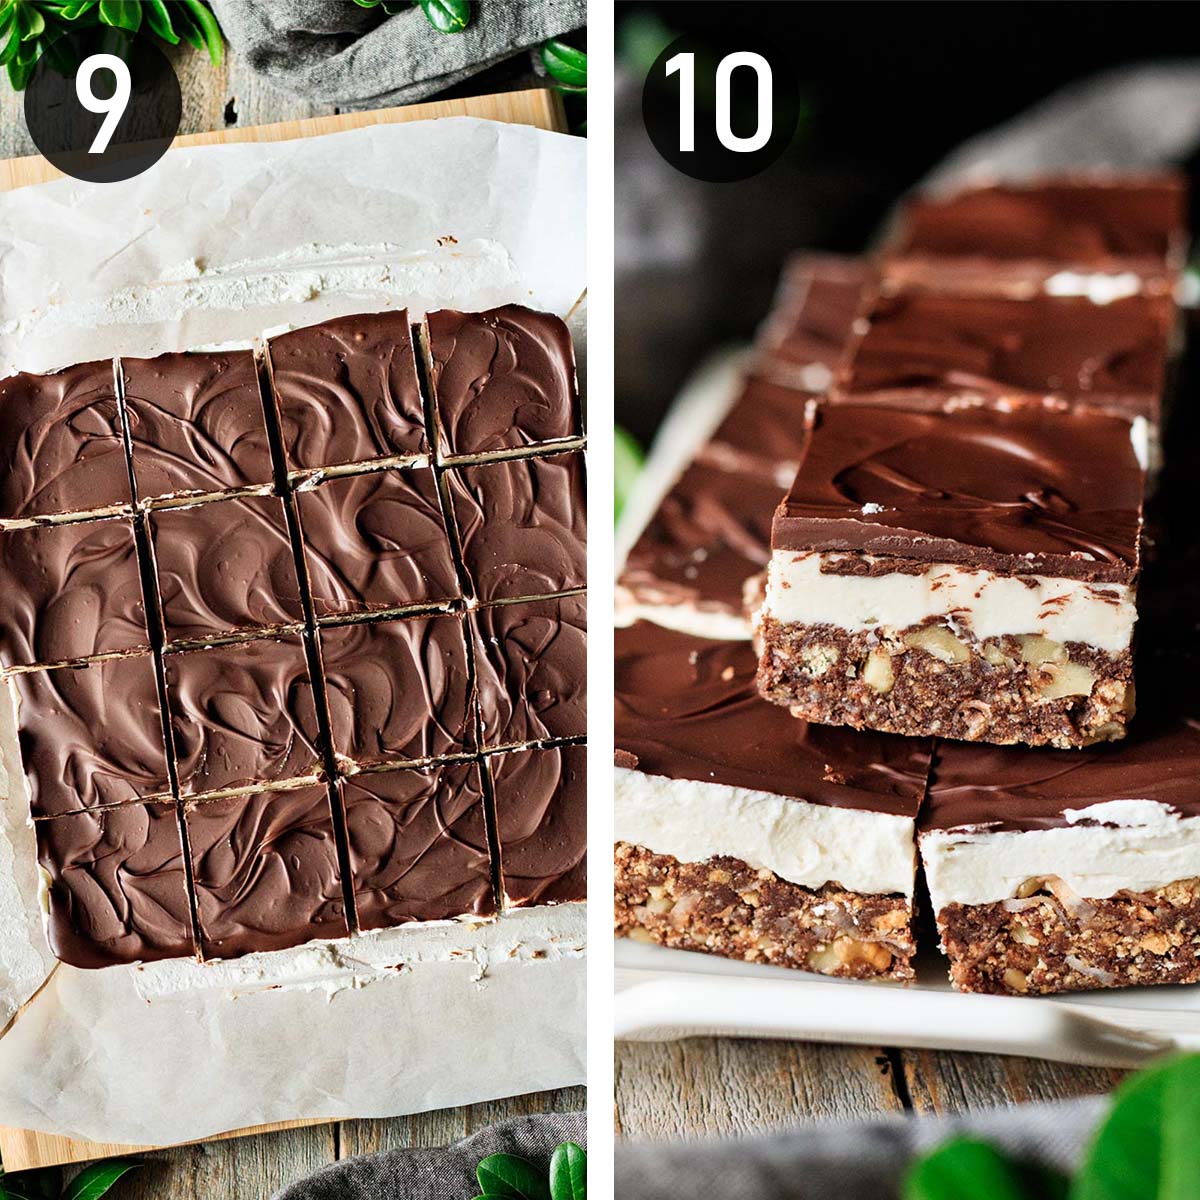
- Spread the chocolate on top of the chilled vanilla filling, swirling it decoratively as desired. (image 9)
- Chill the bars for 30-45 minutes, until the chocolate is hardened. Lift them out of the pan by the parchment paper, place on a cutting board, and slice into individual pieces. Enjoy! (image 10)
Recipe FAQs
Yes, they definitely are! Nanaimo bars were invented in or near the town of Nanaimo, British Columbia, Canada. No one knows who created this dessert, or when they were first made. We do know that this dessert has been around since at least the early 1950s, and have been popular throughout Canada for decades.
This treat is named after Nanaimo, British Columbia, a picturesque city on Vancouver Island. This dessert was invented in or near this city.
Run a knife under hot water, then dry it thoroughly. Use the hot blade to cut the chilled Nanaimo bars without cracking the chocolate layer on top. Make sure to heat and dry the blade in between each cut.
The yellow part is the custard layer, which is basically a buttercream icing with Bird's Custard Powder mixed in. I omitted the custard powder for this recipe, replacing it with cornstarch and extra vanilla extract. If you'd like to use custard powder, add 2 tablespoons of it, then omit the cornstarch and reduce the vanilla to 1 teaspoon.
Leftovers: If you live in a warm climate or it's the summertime, you'll need to keep them in the fridge so they don't melt. If it's cooler in your house because of winter temperatures, they should be okay out of the fridge.
Freezing: Nanaimo bars freeze exceptionally well. Just make sure to cut them into individual pieces, then seal them in an airtight container or zip-top freezer bag and freeze for up to 3 months. Let the bars thaw at room temperature for 20 minutes, then enjoy. Don't microwave them, or they will melt.
Serving Nanaimo Bars
If you're looking for other Canadian-inspired recipes, make sure to try our recipes for butter tarts, Caesar mocktail, tourtière (French Canadian meat pie), maple mousse, and maple walnut bundt cake.
If you're looking for other desserts that don't need the oven, make sure to try our recipes for grasshopper pie, sour cherry pie, no bake cookies, and chocolate turtles.

Expert Tips
- Add a few drops of food coloring to the vanilla filling to change the color. Mint green and pale pink are popular and attractive choices.
- Keep the ratio in mind. The Nanaimo bar base should be twice as thick as the filling. The chocolate topping should be thin.
- Cut into small pieces, since they are very rich.
- Want flavor variations? Flavors such as chocolate orange, raspberry, and mint are good ideas. Rock Recipes has some great ideas for Nanaimo bar variations.
Other No Bake Dessert Recipes


Recipe

Nanaimo Bars
Ingredients
For the Chocolate Base
- 2 cups graham cracker crumbs
- 1 cup sweetened dried coconut flakes
- ½ cup walnuts, chopped
- ½ cup unsalted butter
- ¼ cup granulated sugar
- 5 tablespoons unsweetened cocoa powder
- 1 teaspoon vanilla extract
- 1 egg, beaten
For the Vanilla Filling
- ½ cup unsalted butter, softened
- 2 ½ cups icing sugar, sifted
- 2 tablespoons cornstarch
- 4 teaspoons vanilla extract
- 1 tablespoon heavy whipping cream
For the Chocolate Topping
- 5 ounces dark chocolate chips, 60% cacao
- 1 tablespoon unsalted butter
Instructions
Making the Chocolate Base
- Very lightly grease an 8x8-inch cake pan with butter and line with parchment paper.
- Mix together the graham cracker crumbs, coconut, and walnuts in a medium-sized bowl until well blended.
- Place the butter, sugar, cocoa powder, vanilla extract, and beaten egg into a heatproof bowl and set over a saucepan of gently simmering water. Stir the mixture constantly until the butter has completely melted and the mixture has thickened. It should reach 155°F (68°C) on a thermometer. Immediately remove from the heat.
- Pour the chocolate mixture into the bowl of cracker crumbs and use your hands to mix it all together. Be sure that you mix all the way to the bottom of the bowl.
- Pack the mixture into the prepared pan. Refrigerate for at least 30 minutes.
Making the Vanilla Filling
- Beat the softened butter with a handheld electric mixer, then sift in the icing sugar and cornstarch. Mix on low speed until somewhat blended, then beat on medium to medium-high speed until fluffy, scraping down the sides of the bowl as needed.
- Pour in the vanilla extract and just enough cream to make the icing a stiff but spreadable consistency. Beat on medium speed until the icing is smooth and fluffy.
- Spread the icing evenly over the chilled base, then refrigerate for at least 15 minutes.
Making the Chocolate Topping
- Place the chocolate chips and butter in a heatproof bowl and set over a pan of simmering water. Stir constantly until the chocolate and butter have fully melted.
- Let the chocolate cool for 10 minutes, stirring frequently, then spread the chocolate evenly over the chilled vanilla filling layer.
- Refrigerate until the chocolate has fully set, at least 30-45 minutes.
- Once the chocolate topping has fully set, lift the bars from the pan with the parchment paper. Slice into about 32 small pieces with a sharp knife. Serve chilled.
Notes
- Line the pan with parchment to make it easy to remove the bars.
- Pack the base tightly into the pan so the bars aren't crumbly.
- Slice in small pieces, since this treat is very rich.
- Store leftovers in the fridge if it's hot or on the counter if it's cold.
- Freeze leftovers for up to 3 months and defrost at room temperature for 20 minutes. Do not microwave.
Nutrition
Serving sizes and nutritional information are only an estimate and may vary from your results.
Alex
These Nanaimo bars are creamy, crunchy, and sweet with the vanilla icing. I love these DIVINE bars!! ❤
Emma
Thank you so much, Alex! You can never go wrong with Nanaimo bars!
Beth
It has a lovely crunchy bottom with the graham crackers, walnuts, and coconut. The smooth icing in the middle is almost like whipped cream. The hard layer of chocolate on top is delicious. These bars are really, really good!! ❤
Emma
Thank you, Beth! Each layer of a Nanaimo bar has something yummy about it!
John
Decent enough but if you want a true Nanaimo Bar, swap the walnuts out in the crust for almonds, and for the filling, 1/2 cup butter, 2 cups Icing Sugar, 2 tbsp Vanilla Custard Powder, 2 Tbsp + 2 tsp heavy cream, and you will have the distinct yellow vanilla center that they are supposed to have.
Emma
These bars are a recipe from my Canadian grandmother; the only change to her recipe I made was omitting the custard powder, which you can easily add if you prefer. We're Canadians, and we've always made these with walnuts. Feel free to use what you like best.