One of the first times I heard of Cuban bread was at our local homeschool co-op. One of the moms suggested that we use it to make the garlic bread for the spaghetti lunch, and it was a great success using that wonderful bread. This easy recipe shows you how to make this amazing Cuban bread at home!
Do you love to make bread? Don't miss out on these other great recipes for Cob loaf and Macaroni Grill rosemary bread; your family will love them!

History
Cuban bread originated in Cuba, and was brought to south Florida by Cuban immigrants in the 1800s. Both in Cuba and the US, Cuban families bought their bread from local bakeries instead of making it themselves, so when Francisco Ferlita opened his commercial Cuban bread bakery in Tampa in 1896, it was a huge success. Each loaf was sold for 3-5 cents, and was delivered daily to homes in the Tampa area. Many people had a special nail at the front door where the delivery man would drive the bread onto the nail.
Cuban bread is popular because it is used in the traditional Cuban sandwich. In fact, La Segunda Bakery in Ybor City (a suburb of Tampa) makes 18,000 loaves every day! Watch a tour of the bakery to learn more about the fascinating baking process, and read more about the history of Cuban bread if you want to learn more.
Ingredients

Fortunately, Cuban bread calls for simple pantry ingredients you probably already have. Let's talk about the most important ingredients you'll need!
- Bread Flour: The higher protein content in bread flour as opposed to all-purpose creates more gluten in the dough, causing a higher rise and a lovely chewy texture. My favorite bread flour is King Arthur.
- Yeast: I use fast-action (aka instant) yeast in all of my bread recipes, as it's faster and easier. If you're using active dry, make sure to pause at Step 2 in the recipe and allow the yeast to bloom (sit until it's frothy; about 10 minutes). That shows that the yeast is active.
- Sugar: A touch of sugar gives the yeast extra food in addition to softening the bread a little. Feel free to substitute with another sweetener, like honey, if you'd like.
- Lard: Melted lard is what makes Cuban bread so soft and fluffy. If you're vegan, substitute with vegetable shortening.
See recipe card for full information on ingredients and quantities.
How to Make Cuban Bread
Gather the ingredients: flour, yeast, salt, sugar, lard, and water. Melt the lard in a small saucepan or in the microwave.

- Sift the flour into a bowl, then set aside. (image 1)
- Mix together the water, yeast, and sugar in a bowl. (image 2)

- Stir in the melted lard and half of the flour, mixing to form a thick paste. (image 3)
- Gradually add the remaining flour to make a slightly sticky dough. (You may not need all the flour.) Knead the dough until it is smooth, no longer sticky, and passes the windowpane test. See the recipe card below for an explanation of this technique. (image 4)

- Cover the dough tightly with plastic wrap and let it prove until at least doubled in size, about 1 hour. (image 5)
- Punch down the dough and split it into two pieces. Pat it into a rectangle. (image 6)

- Roll it up tightly from one of the long edges. Pinch the seam to seal, then gently roll it out to make a long, thin loaf. Repeat with the other piece. (image 7)
- Sanitize and split a few palmetto fronds in half lengthwise, then press them into the loaves down the middle. (You can use a piece of string if you don't have access to palmetto fronds.) (image 8)

- Flip the loaf over, then place on a parchment-lined tray and let it rise until nearly doubled in size and springy to the touch, about 45-60 minutes. (image 9)
- Right before baking, flip the bread over so the fronds are on top, using the parchment paper to turn the loaf carefully. (image 10)

- Bake at 425°F for 12-15 minutes per loaf, or until golden brown and crusty. The palm fronds on the dough will score it, controlling the rise and releasing steam. (image 11)
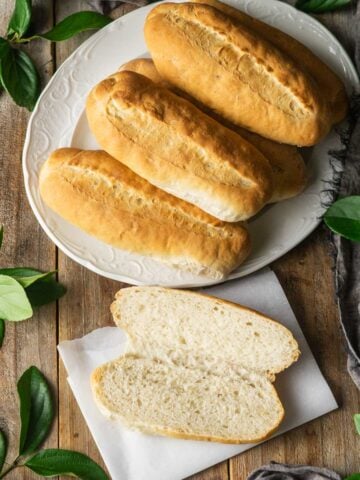
- Let the bread cool completely, then slice as desired and enjoy in garlic toast, homemade croutons, or a classic Cuban sandwich. (image 12)
Recipe FAQs
What makes Cuban bread special is its beautifully thin, crispy crust and soft, fluffy interior. Unlike baguettes, they're made with a little bit of fat in the dough to keep the inside soft and moist. The contrast between the crispy crust and fluffy interior makes Cuban bread perfect for pressed sandwiches and toast!
There are a lot of differences between baguettes and Cuban bread! Although they are both long, skinny loaves of crusty white bread, that's where the differences end.
Baguettes are made from a fatless dough, scored with a sharp blade called a lame before baking, and are very crispy. Cuban bread, by contrast, has lard or shortening in the dough, is scored by palmetto fronds, and isn't quite as crispy as a baguette.
Palm leaves (more accurately known as fronds from saw palmettos) are traditionally used in Cuban bread for a special purpose. As the bread proves on top of the palm fronds, the leaves create a lengthwise cut down the loaf, allowing steam to escape as the bread bakes. This keeps the bread from "blowing out" (getting irregularly shaped) as it bakes.
If you're looking for a readily available substitute for Cuban bread, try using soft French or Italian loaves from the grocery store bakery. Don't use a crusty French baguette; it's too crunchy.
Keep it at room temperature for up to 24 hours, and freeze for longer storage. Store it sealed tightly in a zip-top bag to retain its moisture, and don't refrigerate, as it will make it go stale quickly. You can also freeze Cuban bread in a zip-top freezer bag for up to 3 months.
Serve
Once your Cuban bread is baked and cooled, it's ready to use in a traditional Cuban sandwich (whether you prefer Miami style or Tampa style) or in Cuban toast with a café con leche. Or if you're hungry, just slice and enjoy the bread with butter!
If you're looking for other Cuban recipes to round out your meal, serve a cup of café Cubano and a pastelito de guayaba for dessert.

Expert Tips
- Note about Flour: This recipe was developed using King Arthur bread flour. Please weigh it using a kitchen scale to get an accurate measurement. Remember that the brand of flour and humidity will affect the exact amount you need for the dough.
- Place the dough in a cold oven with a pan of boiling water on the shelf beneath. The humid steam creates a warm, cozy environment for the yeast to work, creating a faster rise.
- How to use the palmetto fronds traditionally: Split 2 palmetto fronds (leaves) in half lengthwise, then lay the 2-3 strips of frond on top of the loaf. Flip the bread over so the fronds are on the bottom, then let it rise. Right before baking, flip the loaf over and bake with the fronds on top.
- Let it cool completely before slicing. Freshly baked bread is full of steam and needs a while to cool off and finish cooking inside. Breaking into the loaf while it's still hot will make the it gummy and doughy.
Other Savory Bread Recipes


Recipe

Homemade Cuban Bread (Pan Cubano)
Ingredients
- 4 cups bread flour, sifted
- ¼ cup lard, melted
- 1 ¼ cups room-temperature water
- 2 ¼ teaspoons fast-action yeast
- 2 teaspoons granulated sugar
- 2 teaspoons salt
Instructions
Making the Dough
- Weigh the bread flour using a kitchen scale, then sift it into a bowl and set aside. Melt the lard in the microwave or in a small saucepan.
- Stir together the water, yeast, and sugar in a mixing bowl until blended.
- Add the melted lard and half of the flour to the mixture. Mix until a wet paste has formed, then add in the salt and enough flour to make a somewhat sticky dough. Please remember that the humidity and brand of flour will affect how much flour you add.
- Knead the dough on a floured surface for 10-15 minutes until the dough is smooth, no longer sticky, and passes the windowpane test. Test the dough by breaking off a lump of dough and stretching it between the thumb and forefinger of each hand to create a windowpane. The dough should stretch until it's translucent in places without breaking. If it does, this means the dough has been sufficiently kneaded. If not, continue kneading for a minute longer and test again.
- Shape the dough into a ball, place in a bowl, and cover tightly with plastic wrap. Let the dough prove until at least doubled in size, about 1 to 1 ½ hours.
- While the dough is proving, prepare the palmetto fronds. Cut two fronds, then split them in half lengthwise. Sanitize them with soap and hot water, then dry them. (If you don't have access to palmetto fronds, use a piece of baker's twine, or simply score the loaf with a lame before baking.)
Shaping
- Line two 11x17-inch cookie sheets with parchment paper.
- Dump the dough onto a floured surface and punch it down all over to knock out air pockets. Cut it into two pieces, then shape each piece into a rectangle and roll it up tightly from one of the long sides. Pinch the seam and ends to seal, then roll it gently with the palms of your hands to extend its length to about 18 inches.
- Press the palmetto fronds (or string) into the top of the loaves, overlapping them slightly, then flip the loaf over so the fronds are on the bottom. Cover the bread with plastic wrap and let it prove for 45 minutes to 1 hour, until the loaves have almost doubled in size and the dough springs back quickly when lightly prodded with a fingertip.
- Preheat the oven to 425°F and put a metal casserole dish on the lowest shelf of the oven to preheat.
Baking
- Once the loaves are fully proved, gently flip then over so the palmetto fronds are on top. If they deflate a little, that's okay; they will rise in the oven.
- Slide the trays into the oven, pour a cup or two of water into the hot metal dish, and quickly shut the oven door.
- Bake for 12-20 minutes per loaf, or until the loaves are golden brown, crusty, and have an internal temperature of 200°F on a meat thermometer. Remove the pan of water during the last 5 minutes. (If you're making one loaf instead of two, it will take 25-30 minutes to bake.)
- Let the loaves cool for 45 minutes to 1 hour on a wire rack before slicing and serving. This allows the bread to finish cooking all the way through.
Video
Notes
- Weigh the ingredients when baking for much more accurate measurements.
- Note about Flour: This recipe was developed using King Arthur bread flour. Please weigh it using a kitchen scale to get an accurate measurement. Remember that the brand of flour and humidity will affect the exact amount you need for the dough.
- Sanitize the palmetto fronds before using. I like to wash them with dish soap and rinse in hot water, then dry them.
- Place the dough in a cold oven with a pan of boiling water on the shelf beneath. The humid steam creates a warm, cozy environment for the yeast to work, creating a faster rise.
Nutrition
Serving sizes and nutritional information are only an estimate and may vary from your results.
Emma
Thank you for sharing, Sonia!
Gladys
is there a substitute for the lard?
Emma
Yes, you can use an equal amount of shortening or butter.
Maribel
I made the Cuban bread but the crust is soft and I remember the Cuban bread with the crust crispy and soft inside do you can help me to do that
Emma
Cuban bread does have a thin crust, which even if it's crispy when it comes out the oven, will soften with time. For a crispier crust, bake the loaf with a pan of boiling water in the oven to create steam. You can also bake it at 425°F for a few minutes shorter.
Kristina
Have you ever made it using a stand mixer instead of kneading by hand? I'm wondering how that will affect things?
Emma
Yes, I usually make this bread in the stand mixer. Initially mix the dough together with the paddle attachment, then switch to the dough hook for kneading. It should take about 5 minutes on speed 2 to knead the dough. Hope this helps, Kristina!
Vitsea
Loved this! Took some time for me since unfamiliar with making Cuban style bread but delicious. Made Cuban Roast & Cuban Black Beans to go with it. Was my mom’s first Cuban cuisine & she loved it! Thank you for sharing your recipe!
Emma
That sounds delicious, Vitsea! We're happy to hear that you and your mom enjoyed the bread so much. Thanks for your kind review!
Kathy Larsen
The first time we made this bread it did takes us some extra time figuring out what we needed to do but I had never made bread before. Now I make it about twice a month and it is relatively easy and amazingly delicious! Thank you!
Emma
That's lovely to hear, Kathy! Thank you so much. We're happy that you enjoy the bread so much!
Emma
I'm sorry about that, but I checked the video, and the photos and words do match. Unfortunately, I can't tell you exactly how much flour to add, because one needs to see and feel the dough's consistency in order to gauge whether to add more or not. Let me know how it turns out for you!
Macayla
How are you going to say this recipe takes 1 hour 5 min when it clearly takes 3-4 hours. ???
Emma
The recipe card now has been corrected with the updated total time. I apologize for this error.
Amy Hart
Calm down, lady. It's not that serious.
Pam Lewinstein
I don't know why I never rated this recipe as I have been making it for years. It's easy and excellent.
There's really nothing more that has to be said about it except delicious. One other thing -- cup measurements work just fine.
Emma
Thank you, Pam! We are so happy to hear that you enjoy this recipe so much!
Steve Zagieboylo
You properly suggest measuring the ingredients on a kitchen scale, but then you give the quantities in cups.
Emma
Steve, Our recipe card defaults to cups (English measures) since we are based out of the U.S.A. To change it to metric (grams) click the word metric which is just under the list of ingredients. Hope this helps! Please let us know how your Cuban bread turns out.
Prisilla
Greetings Brooke & Emma! Thank you so much for this delicious and aromatic bread recipe. It was a truly simple bread to bake especially with your step-by-step instructions and notes to guide me. I noticed a very nice textural difference in the dough and I attribute that to the lard and the longer proofing times. I was impressed! My family definitely enjoyed their Cubano sandwiches and I look forward to making this bread again.
Thanks again!
Emma
That's lovely to hear, Prisilla--thank you! We're happy that you enjoyed it so much!
Renee
Where does one get a palmetto leaf if you live in indiana ?
Emma
Try using an oven-proof metal skewer in place of the palmetto frond. You can always slash it down the center with a sharp knife or lame as well to encourage expansion.